Back
RapidMaps Support
RapidMaps Manual
RapidMaps FAQ
RapidMaps API
RapidMaps Manual - 1. What is RapidMaps?

RapidMaps is a RapidWeaver plugin that lets you add create rich and powerful Google Maps in just few clicks.
Show your shop's location, share a route, create professional maps with directions and labels, choose one of 1200+ available
Retina icons without writing a single row of code or reading cryptic Google Maps documentation.
Main features
- Powerful Google Maps engine
- Support for responsive themes
- 1200+ Retina icons
- Add circles, areas, paths and routes to your map
- Custom labels
- Traffic and feed services
- Intuitive interface
Give directions to your
business
Add a label with directions to drive customers to you.
Create professional-looking maps and add even more details with area, path and circle features. Get inspired by RapidMaps
sample
projects.
No
code. No waste of time
Designed to be so easy to use and intuitive, so that your project will be up and running in a glimpse of an eye.
You don't have to write any code or handle cryptic
documentation to enjoy all feature of the new and powerful Google Maps v3 framework. Add pins simply by entering an address in the search field or right-clicking on the map, then drag them to adjust position!
Turn up hundreds of icons
RapidMaps leads the way in Google Maps integration offering
over 1200 pin Retina icons.
Choose an icon to pick out your store, restaurant, retail outlet or any other point of interest.
2. Requirements and installation
>>
RapidMaps Manual - 2. Requirements and installation
RapidMaps requires RapidWeaver 6.x or higher and an Intel-based Mac. You can buy your RapidWeaver license from Realmac Software store (RapidWeaver 6.x requires Mac OS X Leopard 10.9 or greater, 50 MB disk space).
RapidMaps pages work with most
official and third party themes.
Installation
After downloading RapidMaps plugin from our website, follow instructions on
how to install the plugin in the General FAQ section.
RapidMaps is a shareware: please try it before buy it and check whether it suits your needs. After purchasing it on our store, read
how to register in the General FAQ section.
Upgrades are available for previous version customers.
RapidMaps Manual - 3. Getting started
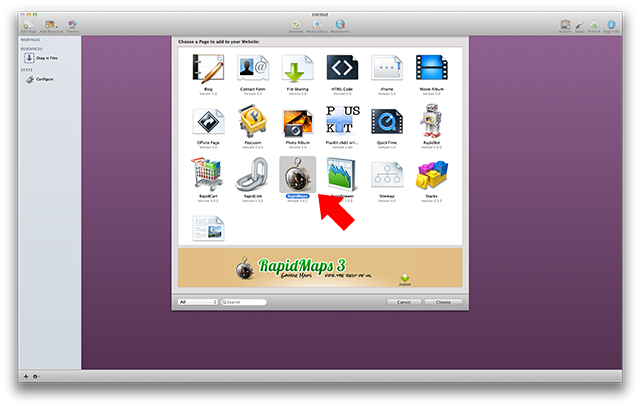
Open your existing RapidWeaver project or create a new one, then add a new page choose RapidMaps from the page types drawer.
Converting
projects created with previous RapidMaps versions
RapidMaps 1.x and 2.x can automatically and safely be converted to RapidMaps 3.x format opening your existing RapidWeaver saving.
RapidMaps Manual - 4. Creating your first map
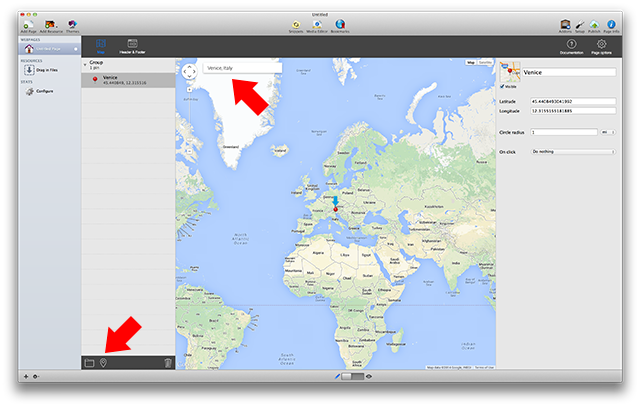
You can add a pin in three different ways.
- By clicking on the pin icon in left bottom toolbar, a pin will be created at center of the map.
- By using "Search location" field on top, a pin will be created on selected location.
- By right-clicking directly on the map, a pin will be created on click position.
Groups
You will notice that a group named "Group" has been created.
Groups let you organize pins in sets and enrich data on the map. Download RapidMaps sample
projects to enjoy the power of this feature in action.
To add a new group, click on the group icon in left bottom toolbar.
New pins will be created in selected group.
Sorting pins and groups
Pins and groups can be reorganized by selecting and move them in lis view.
This functionality is useful when using
path, areas or routes.
Moving and zooming
Published map will reflect center position, zoom level and map type set in RapidMaps editor.
Move your map by dragging it and change zoom and map type, then switch to "Preview" mode to check your customizations.
By double-clicking groups or
pins in the list, map will be centered and zoomed to show selected pins.
Removing pins and groups
Pins and can be removed by selecting them in the list and clicking on "Trash" icon on bottom left toolbar.
Pins can also be removed by right-clicking them in the list.
RapidMaps Manual - 5. Customizing pins and groups
Pins and groups options can be set using the right panel on RapidMaps interface.
Available settings will be shown when a group or a pin is selected from the list.
Group options
Icon
By clicking on the icon preview beside group name, icon drawer will appear.
You can choose among different icon categories using category dropdown menu on top left.
Search field lets you filter icons in selected category.
Otherwise you
can set your own custom icon by selecting "Custom icon" from the dropdown menu.
You need to drag and drop an image onto the grey area and click a point on the image that will appear to select an anchor.
"Retina" options on top lets you set
a Retina image for better displaying on iPhone, iPad and Retina Macs. Once you click on "Done" button on bottom right icon will be set for all pin
in that group and new pins will use the same icon.
Name
You can set a new group name that will be displayed in the list.
Group name doesn't appear in published map.
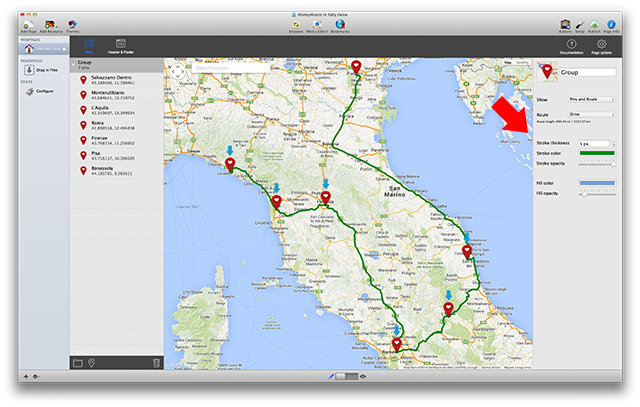
Area, circles, path and
routes
You can choose to display only pins or other shapes by selecting an option in the "Show" dropdown menu.
- "Pins only" option will display pins with no other shapes.
- "Pins and Area" option will display a closed shape with vertices on the pins.
- "Pins and Circles" option will display a circle below each pin. Circle radius can be set in
pin's options.
- "Pins and Path" will display a line with vertices on the pins.
- "Pins and Route" will display a route among pins. Route is automatically calculated by Google Maps. "Route" options lets you set route type for calculation ("Bike", "Drive" or "Walk").
Due to limitations in Google Maps Engine route can be
calculated for up to 10 pins.
Thickness, color and opacity
Area, circle, path and route can be customized using "Stroke" and "Fill" options.
Pin options
Icon
By clicking on the icon preview beside group name, icon drawer will appear.
You can choose among different icon categories using category dropdown menu on top left.
Search field lets you filter icons in selected category.
Otherwise you
can set your own custom icon by selecting "Custom icon" from the dropdown menu.
You need to drag and drop an image onto the grey area and click a point on the image that will appear to select an anchor.
"Retina" options on top lets you set
a Retina image for better displaying on iPhone, iPad and Retina Macs. Once you click on "Done" button on bottom right **icon will be set for selected pin.
Name
You can set a new group name that will be displayed in the list.
Pin name will appear in published map when placing the mouse over a pin.
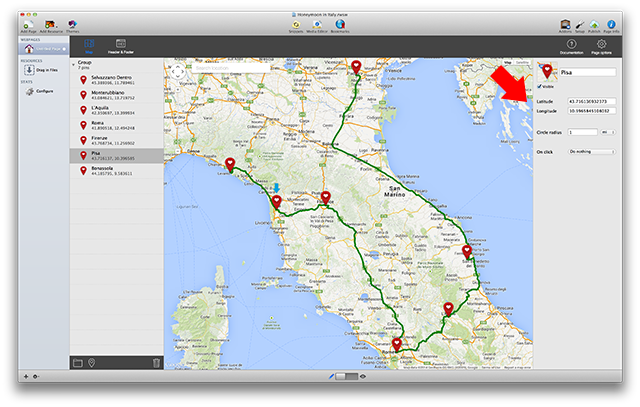
Visibility
By disabling "Visible" option, pin won't appear in published map.
This is useful when you want to display areas, circles or paths.
Latitude and longitude
Pin position can be minutely set by entering Latitude and Longitude values.
Circle radius
When you select "Pins and Circles" in
group options, circle radius can be changed.
Label and
links
"On click" option lets you set a behaviour when you click on a pin on published map.
- "Do nothing" option makes pin not clickable.
- "Show label" option lets you display a label just above the pin. Enter some text in the field below and select "Visible on load" if you want the label to be displayed on load.
Directions links can be displayed in the label.
- "Open URL" option will open the specified link in the same or a new page, depending on "Open in new page" option.
RapidMaps Manual - 6. Customizing the map
By clicking "Page options" on top right of RapidMaps interface, you can add your Google Maps API key and change map settings like size, language or controls, and add services like traffic or KML integration.
Maps API key
Google Maps platform requires a Google Maps API key to let you embed a map in your website.
You can get a free Google Maps API key at the following link: https://developers.google.com/maps/documentation/javascript/get-api-key.
Google requires you to enter your credit card details in case you exceed the maps usage free tier. The free tier is large enough to let you load your map 28,000 times per month without paying. So don't worry!
In order to prevent abuse, you may limit your Google Maps API key usage in your own domain only. You can do that in your Google Maps API key settings window.
In order to govern expenditures, you can monitor your API usage, and set daily limits to all requests to any billable API.
For any questions about Google Maps API key please refer to official FAQ section.
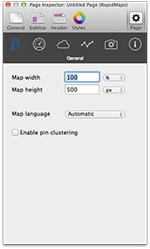
Map size
Map size can be set in "General" panel.
Use popup selection to switch between "pixels" and "percentage".
If you want your map to support responsive themes, width unit must be set to "percentage".
Map language
Map language can be set in "General" panel.
RapidMaps supports localization of map and controls in more than 50 languages.
Pins
clustering
Pins clustering can be set in "General" panel.
By enabling this options, closed pins are grouped into one element.
This options is suggested when there are a lot of pins on the map.
Clustering is not active in edit mode.
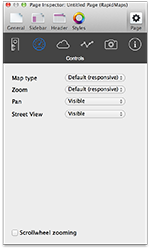
Controls
Map controls can be set in "Controls" panel.
Map type control can be set as default, dropdown menu or horizontal bar.
Control can be hidden by choosing "Not visible" from the dropdown.
If you want map type control to adapt to responsive layout, choose "Default (responsive)" from the dropdown.
Zoom control can be set as default, small or large.
Control can be hidden by choosing "Not visible" from the dropdown.
If you want zoom control to adapt to responsive layout, choose "Default (responsive)" from the dropdown.
Pan and Street view controls can be hidden by choosing "Not visible" from the dropdown.
By enabling "Scrollwheel zooming", your map can be zoomed in and out using mouse's scrollwheel.
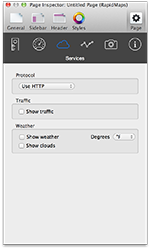
Protocol
Protocol can be set in "Services" panel.
Set it to "HTTP" or "HTTPS" if you want Google Maps Framework to use either.
Set it to "Automatic" if you want Google Maps Framework to use the same protocol of your website.
Please keep in mind
that "Automatic" protocol will not work when displaying your exported RapidMaps page on a local machine.
Traffic
Map traffic can be enabled in "Services" panel.
Enable Traffic on map to show real-time traffic information.
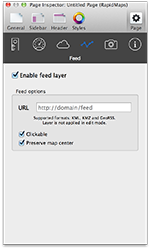
Feed
Map feed can be set in "Options" panel.
By enabling "Clickable", feed content can be clicked to display available informations.
By disabling "Preserve map center" map will be centered to feed content.
RapidMaps lets you load feeds with geographic information on your map, called GeoRSS. GeoRSS is designed as a lightweight, community driven way to extend existing feeds with geographic information.
To add your GeoRSS feed, all you have to do is enter the URL of GeoRSS file to load.
KML and KMZ
RapidMaps can import KML or KMZ data. These are file formats used by Google Earth to exchange geographic information. This means that you can view data you create and share with Google Earth through RapidMaps on your map.
How to create KML or KMZ
files
You can easily create KMZ files with Google Earth. When you save a placemark or folder from your Places panel you have the choice to save your data as a KMZ file or a KML file.
Please refer to Google
Earth Documentation for further information about this feature or take a look at Google
KML Tutorial.
RapidMaps Manual - 7. Adding header and footer
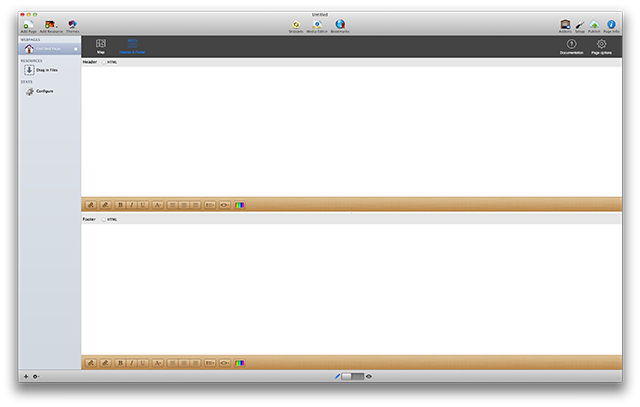
By using "Header and Footer" window, you can add custom text above and below the map.
Select "HTML" options to write HTML code or use toolbar for styled text below.
RapidMaps FAQ - What are RapidMaps requirements?
RapidMaps requires RapidWeaver 6.x or higher.
RapidMaps pages work on all themes and on most browsers.
Please try the demo before purchasing it.
RapidMaps FAQ - How do I center the map in the page?
If you want to center the map in the page, you need to use a simple CSS rule.
Copy and paste the following code in "Options" -> "Header" -> "CSS" window of your RapidMaps page.
#rapidmaps-editor { margin: auto; }
RapidMaps FAQ - What are the limitations for unregistered RapidMaps?
An additional pin located on omnidea HQ in Padova (Italy) is added to published page and map is centered on it.
RapidMaps FAQ - After installing RapidMaps, I can't see it in "Add new page" window. What do I need to do?
After installing RapidMaps, you need to restart RapidWeaver.
RapidMaps FAQ - How do I add directions links?
You can display directions links in pins label.
Enter "From here" (or your preferred text) in label field, highlight it and select link option on toolbar below.
Enter %DIRECTIONS_FROM% in URL field and close the window.
Enter "To here" (or your preferred text) in label field, highlight it and select link option on toolbar below.
Enter %DIRECTIONS_TO% in URL field and close the window.
By clicking on "From here" or "To here" links in published map, Google Maps website will be displayed with directions from/to pin location.
RapidMaps FAQ - Why is my RapidMaps page marked as un-registered?
RapidMaps is a paid upgrade for all RapidMaps 2.x
customers.
RapidMaps 2.x users need to purchase a upgrade license.
RapidMaps 2.x page contents in your old projects will be preserved.
RapidMaps FAQ - Why does my map show a grey box?
Due to mid-2018 changes in Google Maps license terms, you need to get a Google Maps API key in order to run a Google Maps map in your website.
If you see a grey box in place of your map saying "Oops! Something went wrong." your Google Maps API key is either missing or wrong.
You can get a free Google Maps API key at the following link: https://developers.google.com/maps/documentation/javascript/get-api-key.
RapidMaps API - RapidMaps API Guide
Introduction
RapidMaps 2.2.x or higher is required.
You can interact with your RapidMaps page using JavaScript.
For example you can:
- zoom on a group or a pin
- get directions to a pin (available in next
update)
- show/hide groups/pins/areas/paths/routes/circles/photos
(soon available)
- show photos of different user or with different tags (soon
available)
More functionalities will be introduced in next updates.
WARNING: you need to have basic JavaScript knowledge in
order to use this guide. We don't provide support on generic
JavaScript questions.
Available functions
- zoomGroup
- zoomPin
- bouncePin
- showLabel
- showGroup
- showArea
- showPath
- showCircles
Getting
started
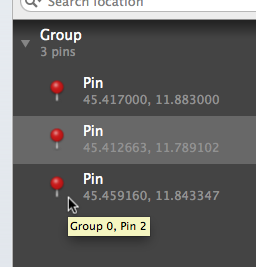
When you interact with a group or a pin, you need to specify its ID.
ID is shown when you hold your mouse over a group or a pin in the list.
In following code group's and pin's ID are non-negative integer values indicated respectively as GROUP_ID and
PIN_ID.
Zoom on a
group
Available in RapidMaps 2.2.0.
Code
editor.zoomGroup(GROUP_ID);
Examples
Button
<input type="button" value="Zoom on group" onclick="editor.zoomGroup(0);" />
Link
<a href="javascript:editor.zoomGroup(0);">Zoom on group</a>
Zoom on a pin
Available in RapidMaps 2.2.0.
Code
editor.zoomPin(GROUP_ID, PIN_ID);
Examples
Button
<input type="button" value="Zoom on pin" onclick="editor.zoomPin(0,1);" />
Link
<a href="javascript:editor.zoomPin(0,1);">Zoom on pin</a>
Bounce a pin
Available in RapidMaps 2.2.1.
Set GROUP_ID or PIN_ID to
-1 to disable animation.
Code
editor.bouncePin(GROUP_ID, PIN_ID);
Examples
Button
<input type="button" value="Bounce pin" onclick="editor.bouncePin(0,0);" />
Link
<a href="javascript:editor.bouncePin(0,0);">Bounce pin</a>
Show pin's label
Available in RapidMaps 2.2.1.
Set GROUP_ID or PIN_ID to
-1 to hide all labels.
Code
editor.showLabel(GROUP_ID, PIN_ID);
Examples
Button
<input type="button" value="Show label" onclick="editor.showLabel(0,0);" />
Link
<a href="javascript:editor.showLabel(0,0);">Show label</a>
Show group's pins
Available in RapidMaps 2.4.0.
Set GROUP_ID to -1 to hide all pins or to -2 to show all pins.
Code
editor.showGroup(GROUP_ID);
Examples
Button
<input type="button" value="Show group" onclick="editor.showGroup(0);" />
Link
<a href="javascript:editor.showGroup(0);">Show group</a>
Show group's area
Available in RapidMaps 2.2.1.
Set GROUP_ID to -1 hide all areas or to -2 to show all areas.
Code
editor.showArea(GROUP_ID);
Examples
Button
<input type="button" value="Show area" onclick="editor.showArea(1);" />
Link
<a href="javascript:editor.showArea(1);">Show area</a>
Show group's path
Available in RapidMaps 2.2.1.
Set GROUP_ID to -1 hide all paths or to -2 to show all paths.
Code
editor.showPath(GROUP_ID);
Examples
Button
<input type="button" value="Show path" onclick="editor.showPath(1);" />
Link
<a href="javascript:editor.showPath(1);">Show path</a>
Show group's circles
Available in RapidMaps 2.2.1.
Set GROUP_ID to -1 hide all circles or to -2 to show all circles.
Code
editor.showCircles(GROUP_ID);
Examples
Button
<input type="button" value="Show circles" onclick="editor.showCircles(1);" />
Link
<a href="javascript:editor.showCircles(1);">Show circles</a>
Demo project
Download the following demo project that shows you how to use RapidMaps 2 API in Header/Footer section.
RapidMaps_2_API.rwsw.zip