Back
RapidLink Support
RapidLink FAQs
RapidLink Manual
RapidLink FAQs - What is RapidLink?
One problem faced by many websites is how to securely automate delivery of digital products after payment. If you sell digital products such as music mp3�s, software, ebooks, photographs, themes or any other download file thru PayPal, RapidLink will
automate the delivery process keeping your clients happy and making your life just that bit easier.
You don't need to worry about order delivering anymore.
Your customers will receive their purchase in few seconds!
RapidLink FAQs - How does RapidLink work?
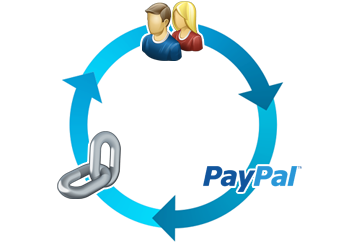
The customer purchases your product using RapidCart or other PayPal-based e-commerce solutions.
PayPal, in backend, notifies RapidLink with order details (this happens even if the buyer closes the
browser before returning to your site).
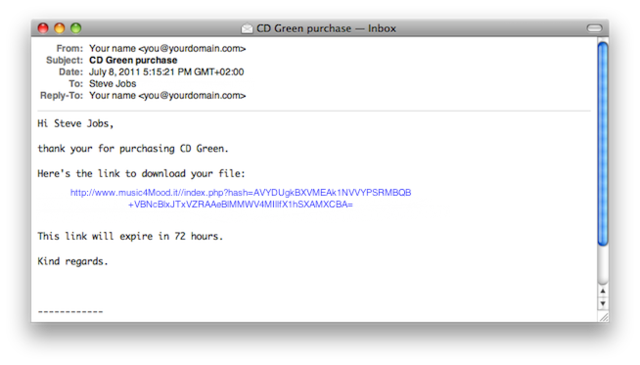
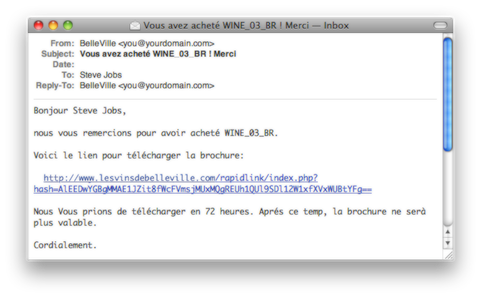
Once that product, currency and price have been verified, RapidLink automatically send a email to the customer with details for downloading (or registering) the product.
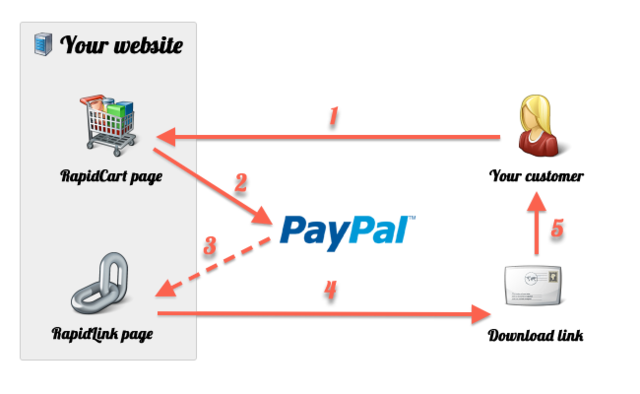
- The customer visits your store...
- ... then buys your products and pays thru PayPal
- In backend, PayPal IPN (Instant Payment Notification) sends order details to RapidLink...
- ... that verifies the order and sends a receipt to the customer
- The customer receives the receipt with details on how to download (or register) the product
Rest on the beach while your customers place orders and
RapidLink delivers the products!
The process is completely automatic and requires no
actions from you.
RapidLink FAQs - What are RapidLink requirements?
RapidLink requires PHP 5 or higher.
RapidCart is not a RapidLink requirement. RapidLink can be used with any PayPal-based ecommerce solution, including of course any RapidCart version.
RapidCart 3.x or higher is required only for product
syncing between RapidLink and RapidCart.
RapidLink needs an ISP that can handle external SMTP sending in order to use the external SMTP feature.
RapidLink FAQs - What are the limitations for unregistered RapidLink?
Maximum 2 products per page.
Unregistered warning message in email and download page.
RapidLink FAQs - I can't see my products while previewing my RapidLink page, what's wrong?
RapidLink handles only digital downloads delivery after receiving a PayPal IPN.
In order to display your products, you need to use it in combination with a shopping cart solution, like RapidCart:
RapidCart official
page
RapidLink FAQs - Can I sync RapidLink with RapidCart Products?
If you're a RapidCart user, RapidLink offers an easy way to sync with them.
1) Create your products in RapidCart:
2) Set a unique SKU (Stock Keeping Unit, that is a unique identifier), price and coupon discount (if any) for each of your products:
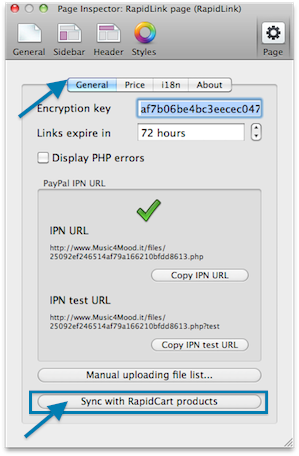
3) From your RapidLink page, Page Option >
General panel, click Sync with RapidCart
products
RapidLink creates missing products and sync product data for existing ones (products must have a unique SKU in order to sync correctly).
Please note that product syncing requires RapidCart 3.x
or higher.
RapidLink FAQs - How do I link my RapidLink installation with PayPal?
Once you will publish or export the page, you will find your PayPal IPN URL in Option window.
In order to set it in your PayPal account, follow these steps:
- Log in your PayPal account
- Go to "Profile"
- Click on "Instant Payment Notification Preferences" in "Selling Preferences" section
- Copy your PayPal IPN URL from RapidLink Options window
- Paste it in "Notification URL" field
- Click on "Receive IPN messages (Enabled)"
- Save
From now on, every purchase will be notified to your RapidLink page.
If product's SKU and price match, RapidLink will send a email to the customer with instructions to download the product.
RapidLink FAQs - How do I test my RapidLink installation?
Once you will publish the page, you will be able to test it with PayPal Sandbox.
In order to test it, follow these steps:
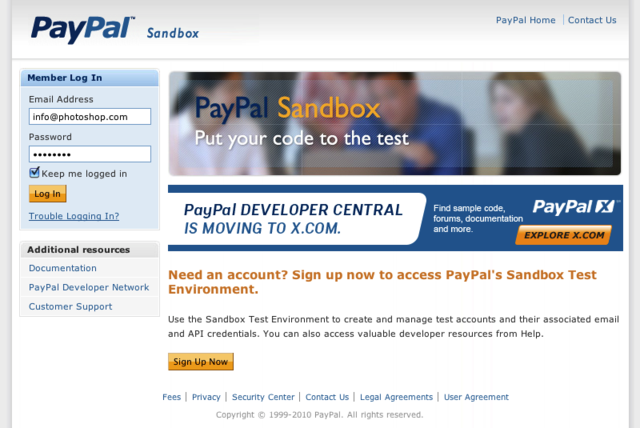
- Log in PayPal Sandbox
page
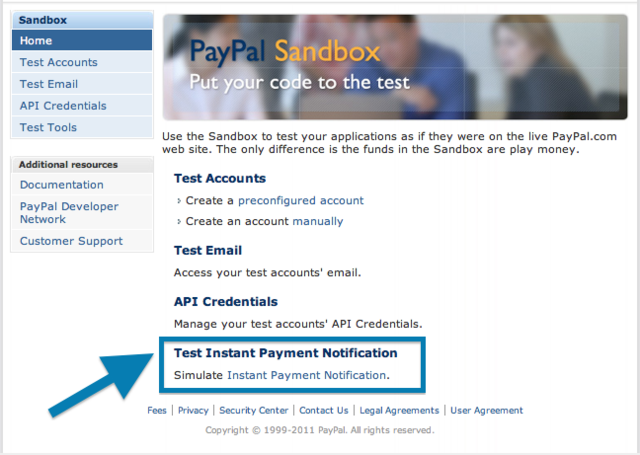
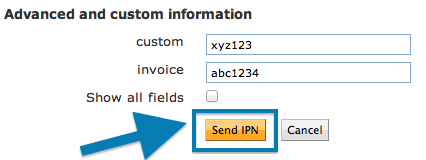
- Click on "Simulate Instant Payment Notification"
- Copy your PayPal IPN test URL (with
?test appended) from RapidLink Options window
- Paste it in "IPN handler URL" field
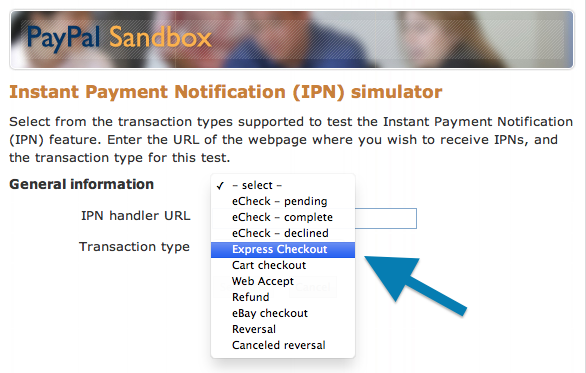
- Select "Express Checkout" from "Transaction type" dropdown
- Set "payer_email" to your email address
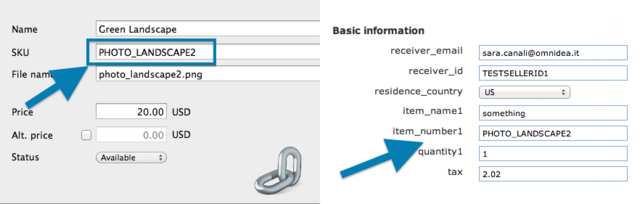
- Set "item_number1" to your product SKU
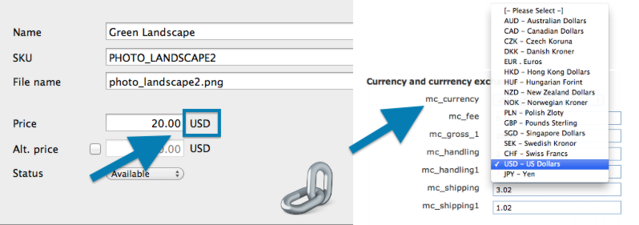
- Set "mc_currency" to the currency you have set in RapidLink
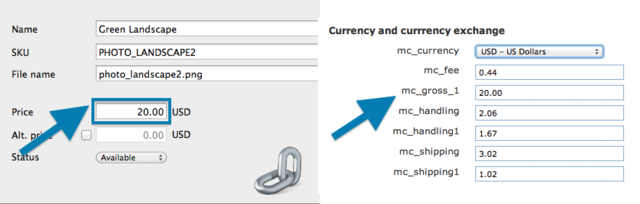
- Set "mc_gross_1" to your product price (or special price)
- Click on "Send IPN"
If you receive an email containing the instructions to download the product, your RapidLink installation is correctly set up.
RapidLink FAQs - Can I resend a PayPal notification?
Yes, you can.
Log in your PayPal account and click on "History > IPN History" on top menu.
From the transactions list, select the notification you want to resend and click on "Resend Selected".
PayPal will send the notification in few minutes.
RapidLink FAQs - How do I send complimentary products with RapidLink?
Once you publish your RapidLink page, you will be able to send complimentary products and codes to your customers directly from RapidLink interface.
- Click on "Send product..." in Product section
- Fill in "First name", "Last name" and "Email" fields (other fields are not mandatory)
- Click "Send"
You customer will receive an email containing the instructions to download the product.
RapidLink FAQs - What tags can I use in email subject and body?
In subject field you can use the following tags:
%PRODUCT% (product name)%SKU% (product SKU)
In body field you can use the following tags:
%FIRST_NAME% (customer first name)%LAST_NAME% (customer last name)%EMAIL% (customer email address)%ADDRESS% (customer address)%ZIP% (customer ZIP)%CITY% (customer city)%STATE% (customer state)%COUNTRY% (customer country)%PRODUCT% (product name)%SKU% (product SKU)%LINK% (download link, if product type is File)
%CODE% (code, if product type is Code)%EXPIRATION% (time expiration in hours)%TRANSACTION_ID% (PayPal transaction ID)%DATE% (transaction date)
RapidLink will automatically replace them with correct data received from PayPal.
Note: make sure to use %LINK% and
%CODE% tags in email bodies, otherwise your customer
will not be able to download (or register) the
product.
RapidLink FAQs - Will I be notified of product downloads?
When someone (hopefully the customer) clicks on the link to download a product, you will receive an email reporting what product has been downloaded and who downloaded it.
This will prevent link spreading to unauthorized people.
RapidLink FAQs - Can I sell registration codes or coupon codes?
Yes. Simply create a .txt file containing one code per line and drop it onto product list.
RapidLink FAQs - Will I be notified when running out of codes?
When less than 10 codes are available, RapidLink will notify it to you with an email.
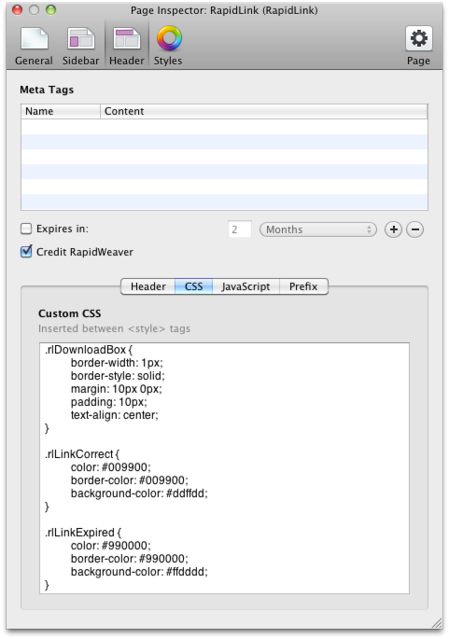
RapidLink FAQs - How do I customize the download box in my published page?
Download message is wrapped into a HTML DIV element with CSS class .rlDownloadBox.
Additional CSS class .rlLinkCorrect is appended for
"Your download will start in few seconds..." message.
Additional CSS class .rlLinkExpired is appended for
"This download link is not valid..." message.
For example, if you want to customize the box with a green border for correct link and a red border for expired link, use the following CSS rules:
.rlDownloadBox { border-style: solid; border-width: 2px; }
.rlLinkCorrect { border-color: green; }
.rlLinkExpired { border-color: red; }
RapidLink FAQs - How do I create a template for RapidLink?
Template are bundles (folders) with .rltemplate extension.
Folder's structure is:
- myTemplate.rltemplate
- Contents
- Info.plist
- Resources
- Icon.png
- Template
- index.html
- [other resources]
Info.plist is a XML file containing template name, copyright, version and other information.
Icon.png is a 90x120 pixel image used to display a preview in Template window.
index.html is the HTML template.
Other resources (e.g. CSS or images) must reside in
Template folder and must be linked using
%URL% tag in HTML code (see
AppleOrder.rltemplate.zip example).
Index.html file must contains %TEXT% and
%CREDITS% tags, in order to make RapidLink properly included message text and credits.
In addition you can use all tags listed in
this page.
Once your template has been completed, if you double-click your
myTemplate.rltemplate bundle, RapidLink will automatically install it.
If double-clicking the template bundle doesn't work, you can manually install it by copying the bundle in Application
Support/RapidWeaver/RapidLink folder inside your Home.
Standard templates are available inside RapidLink.rwplugin package in Contents/Resources/Templates folder.
RapidLink FAQs - Can I sell large files using RapidLink?
Dragging files directly to product list file content is embedded into RapidWeaver project saving.
This could potentially lead to unexpected results or errors when saving big project files (e.g. 1 GB+).
RapidLink offers the ability to either manually upload bigger files or host them on external services to avoid these issues.
Refer to
Setting distribution mode manual section for further info.
RapidLink FAQs - My download is corrupted, how can I fix that?
When a PHP error occurs it can be logged (depending on your server logging settings) directly in your downloaded file, causing file corruption.
This generally happens with larger files and is due to exausted memory or time limit reached on server side. Adjust your PHP settings (or ask your hosting provider to adjust them) increasing memory and time limits for your scripts.
As a last resort, you may open your corrupted download using a text or hex editor, scroll at the end of the file and read the actual error message logged.
RapidLink FAQs - Why don't I receive download links in my Gmail account?
Actually you receive them!
Check your Sent folder.
Gmail skips Inbox and directly move messages to Sent folder if sender's and receiver's addresses match.
RapidLink FAQs - Why do I receive download emails twice for each transaction?
Are you testing your RapidLink installation with the same email address (or two different email addresses grouped in one email client) as buyer and seller?
If so, actually you are receiving two download emails.
RapidLink sends the same download email to buyer and to seller in BCC as a confirmation that all works correctly.
This is why you see it doubled in your email client.
As a test, you can use two different email addresses (not used in the same email client) for your next transaction.
RapidLink Manual - Step by step guide | Setting up RapidLink
Before proceeding, take a look also at RapidLink
FAQ.
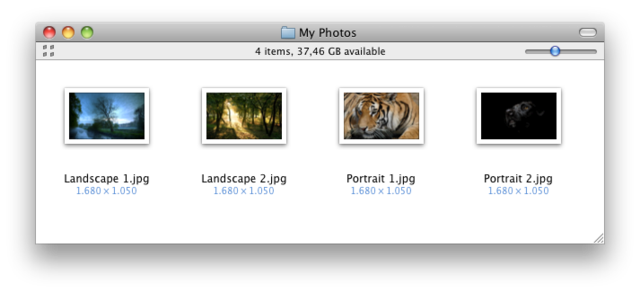
In this step by step guide we'll show you how to set up RapidLink to sell and automatically deliver digital pictures. Setup process would be exactly the same also for different file types (e.g. mp3, pdf, mov...).
1) Here's the photo you'd love to sell:
2) Open your RapidWeaver project and double check that in
Site > Show Site Setup >
General panel the Web Address field is correctly set.

3) Add a RapidLink page to your project:

3) Set your currency:
4) Optional - If you're a RapidCart user, learn how to
sync your products with RapidCart.
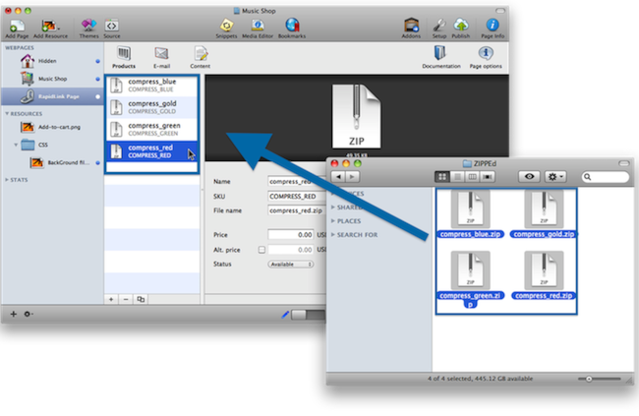
5) Create your products. Drag your files and drop them on product lists to create your RapidLink products from scratch:
If you're going to sell text codes (e.g. registration codes or coupon codes), please refer to
this FAQ.
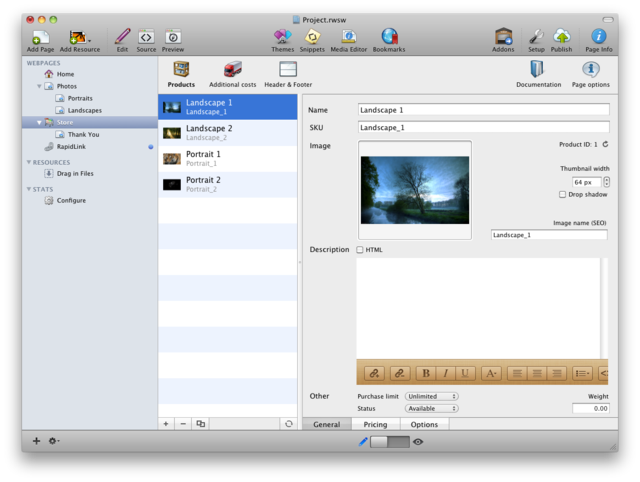
6) RapidLink automatically creates a product for each file you drop:
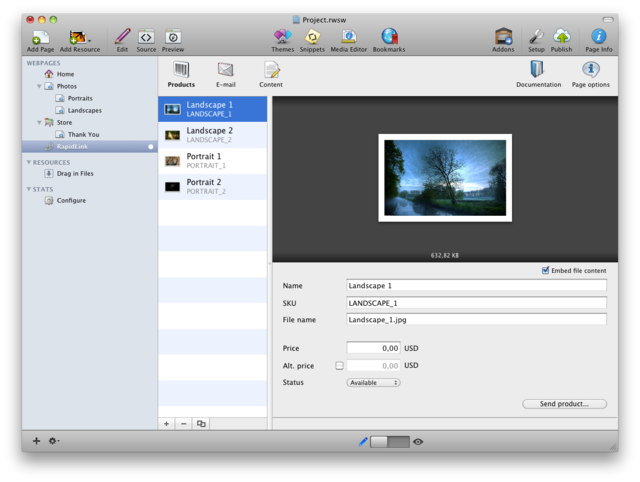
7) Set SKU (Stock Keeping Unit, that is a unique identifier) and price for each product:
8) Optional - If you're going to sell particularly large files, read carefully
this FAQ in order to discover how to manage them.
9) Set up the content for email receipt, which is automatically sent after a successful purchase:
10) Choose an email template:
11) Optional - Set up an external SMTP server used by RapidLink to send email notifications:
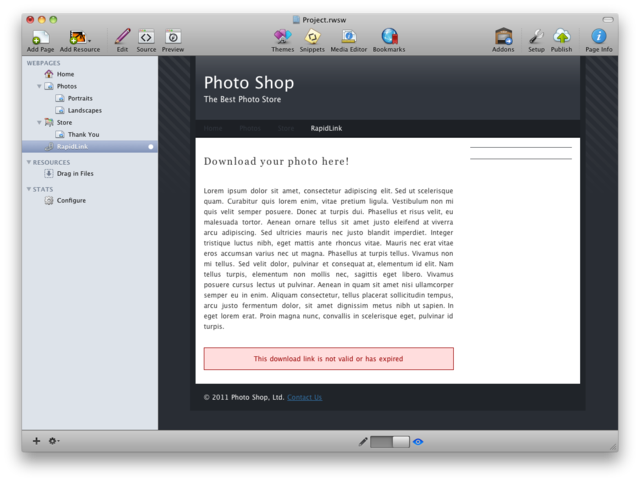
12) Optional - Set up the content for download page (that is the page customers are redirected to download your files):
13) Optional - Translate and/or customize download page messages:
14) Preview your RapidLink page:
15) Optional - Style your download page:
16) Optional - Preview your styled download page:
17) Publish or export your project, so that RapidLink generates "IPN" and "IPN test" URLs:
18) Test your RapidLink setup sending a test purchase. From RapidLink choose a product, then click Send product... button. Fill required fields and then click Send:
The email address you've entered should receive an email containing the instruction to download the product.
If everything works as expected, move on to
Step by step guide - Setting up PayPal
RapidLink Manual - Optional Step | Testing your RapidLink page with Paypal sandbox
You'll need a free PayPal developer account to test your
RapidLink setup. If you don't have a developer account, sign up for free here.
1) Login with your PayPal Developer account:
2) Click on Test Instant Payment Notification:
3) Enter IPN Test URL generated by RapidLink and available from Page Options >
General panel:
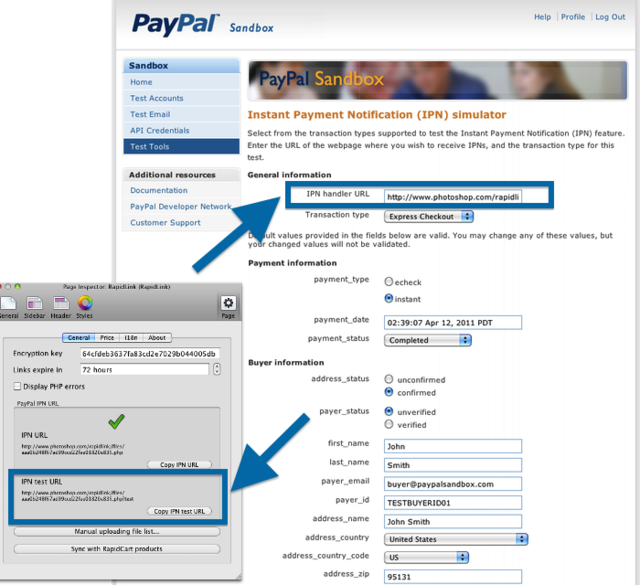
4) Select "Express Checkout" from "Transaction type" dropdown
5) Set "payer_email" to your email address (Buyer information)
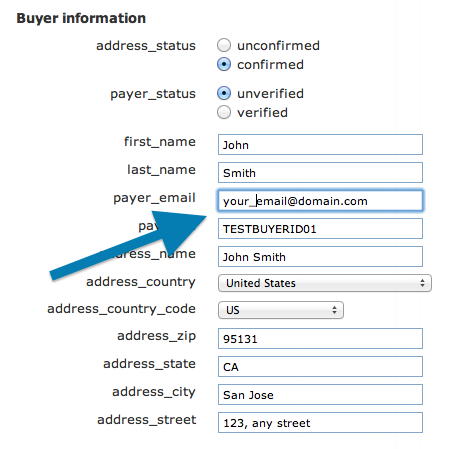
6) Set "item_number1" to your product SKU (Basic Information)
7) Set "mc_currency" to the currency you have set in RapidLink
8) Set "mc_gross_1" to your product price (or special price)
9) Click on "Send IPN"
If everything works as expected, the email address entered should receive a purchase notification from RapidLink.
Now you're ready
to link your real Paypal account with RapidLink.
RapidLink Manual - Step by step guide | Setting up PayPal
Before proceeding, complete
step by step RapidLink setup.
OPTIONAL STEP:
Testing IPN and RapidLink setup before starting your
business.
Setting up PayPal
5) Login to your PayPal account and navigate to
Profile > My selling tools >
Instant payment notifications.
6) Enter IPN URL (not the test one) generated by RapidLink and available from Page Options >
General panel and save PayPal settings:

RapidLink setup is now complete and ready to automatically deliver your digital goods!
RapidLink Manual - Introduction | What is RapidLink?

RapidLink is a RapidWeaver plugin that handles
IPNs from PayPal and lets you sell MP3s, Photos, PDFs and any other file types without you lifting a finger!
RapidLink is your digital downloads safe assistant for RapidWeaver that automates the delivery process and all in a fully secure way!
Rest on the beach while RapidLink delivers your
products...
List your files. Set prices and export your site. That's all you have to do to get ready to sell your digital downloads with RapidLink in a perfectly seamless way!
One click does it all: RapidLink creates IPN for your PayPal account, traces your links and all in a fully secure way!
No matter what your business. RapidLink helps boost it.
Are you a professional Photographer and want to sell your works-of-art? Are you a software developer aiming to publish your apps? Or do you simply want to share some papers or files with your customers?
No matter what you sell, RapidLink will be your digital download safe assistant!
Link spreading is deprecated!
With RapidLink, your digital downloads are always in your control: you'll receive a notification email each time one file is downloaded, so you can prevent and block link spreading in a flash and sleep safely!
Give the gift of style to your communications.
Dazzle customers with your sparkling new style! RapidLinks comes with 10 free templates created by ThemeFlood, the RapidWeaver community's most talented theme developer, to customize your notification emails.
In addition, you can further create your own template to give the look and style of your company or site.
Next: RapidLink main features
RapidLink Manual - Introduction | RapidLink Main features
Previous: What is RapidLink
RapidLink main features are:
- PayPal automatic IPNs URL generator;
- PayPal-based shopping cart integration;
- RapidCart 3.X Synchronization;
- Price, product and name check before
delivery;
- Link encryption through customizable encryption
key;
- Code handler for digital delivery through
keys;
- Manual uploading file lists;
- Support for all currencies (United States Dollar, Euro, Australian Dollar, Canadian Dollar, Czech Koruna, Danish Krone, Hong Kong Dollar, Hungarian Forint, Israeli New Sheqel, Japanese Yen, Mexican Peso, Norwegian Krone, New Zealand
Dollar, Polish Zloty, Pound Sterling, Singapore Dollar, Swedish Krona, Swiss Franc, Chinese Yuan, Romanian Leu, Russian Ruble, South Korean Won, Thai Baht are the current presets but you�ll be able to add your own currency);
- Messages and labels internationalization;
- Automatic check for updates;
- Price and alternative price setting;
- Customizable Notification Emails;
- HTML Email templates;
- SMTP settings;
- Optional handling of external huge files;
- ... More
Next: Requirement and Installation
RapidLink Manual - Introduction | RapidLink Requirement and Installation
Previous: RapidLink Main Features
RapidLink Requirements
RapidLink requires RapidWeaver 4.x or higher and an Intel-based Mac. You can buy your RapidWeaver license from Realmac Software store (RapidWeaver 4.x requires Mac OS X Leopard 10.5.2 or greater, 50 MB disk space). RapidLink pages work with most official
and third party themes.
Your hosting provider should run PHP 5 or higher.
- NOTE: RapidCart is not a RapidLink requirement. RapidLink can be used with any PayPal-based e-commerce solution, including of course any RapidCart
version. RapidCart 3.x or higher is required only
for product syncing between RapidLink and RapidCart.
Downloading and Registering
RapidLink is a shareware. Before you purchase a RapidLink license, please spend time to test it in Demo mode. You can download it from the RapidLink page.
NOTE ABOUT DEMO: All of the features of RapidLink are active, but for a limited number of items (two per page); unregisterd warning message will display in notification email. To use RapidLink without any limitations, you need to
purchase a license. Once you've purchased a license and registered it into the plugin, all the limitations are removed. You don't even have to download anything new, the copy you've already had will be unlocked.
To purchase a license visit omnidea store. Your license file will arrive via email just a few minutes after you complete your purchase.
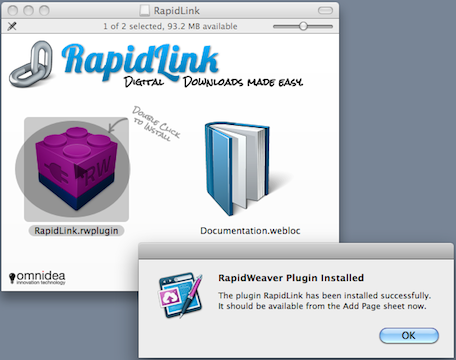
Double-click on RapidLink disk image to open it. Clicking on the RapidWeaver plugin icon will start your installation process. Check the omnidea knowledge
base by clicking the "documentation" icon.
Registration through license file or code
Please read the General FAQ on
registration.

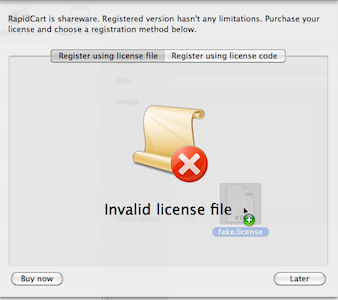
Installation problems
Using license file and RapidLink disk image
The right way to use license file is to save it into a Finder folder and drag it to the registration window as explained in the previous paragraph. Do not drag RapidLink image you downloaded from omnidea web site to the registration window, but double-click
on it to install in RapidWeaver. Wrong files dropped into the registration window will show an X Sign as the picture below shows.
Using web mail service
If you�re using a webmail do not drag the license icon to the registration window directly: web browsers may not properly download the attached file. Save attachment instead and then drag it from a Finder folder to the registration window and it will
work fine.
Next: Add a RapidLink page
RapidLink Manual - Introduction | Adding a RapidLink page to your project
Previous: Requirements and installation
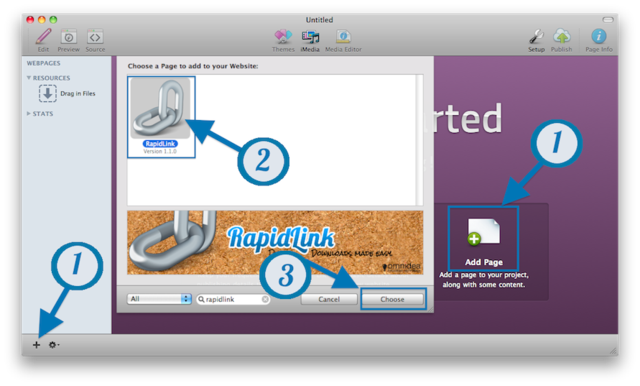
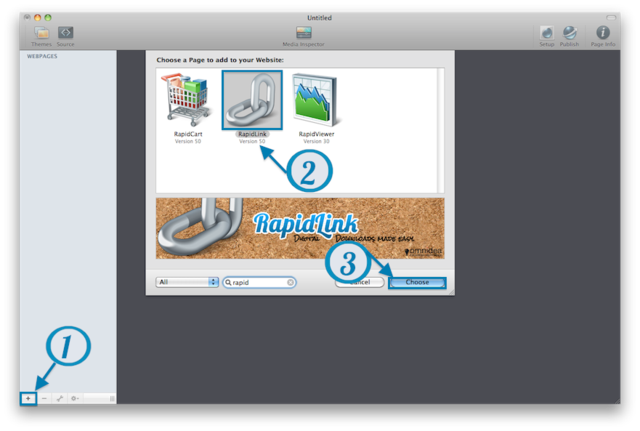
RapidWeaver 5.x version
Once installed, RapidLink is ready to get used. Open your existing RapidWeaver Project or create a new one(1) by clicking the plus button on the left-bottom corner of RapidWeaver panel. Select RapidLink icon (2) among third party plugins and push
"Choose" button (3).
RapidLink panel will display.
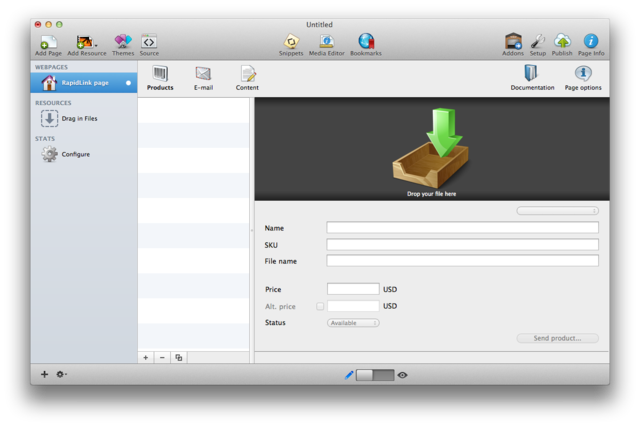
Now you're ready to set your digital downloads shop!
-
NOTE: Please remember that you need a
PayPal-based shop in order to properly set a shop where customers choose articles to purchase.
-
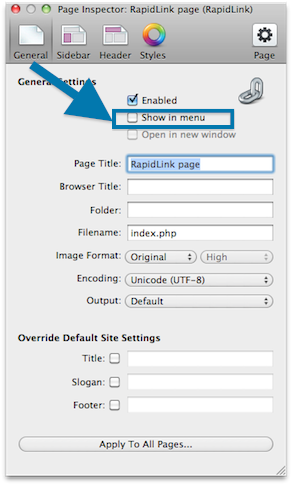
TIP: You may prefer to hide RapidLink page to your visitors unless they got the link, so simply open Page Info and uncheck "Show in menu".
RapidWeaver 4.x users
To add a new RapidLink page, click the "plus" button (1) on the lower-left corner of the window and then choose "RapidLink" among plugins. (2)(3)
Next: RapidLink Settings | Page Options
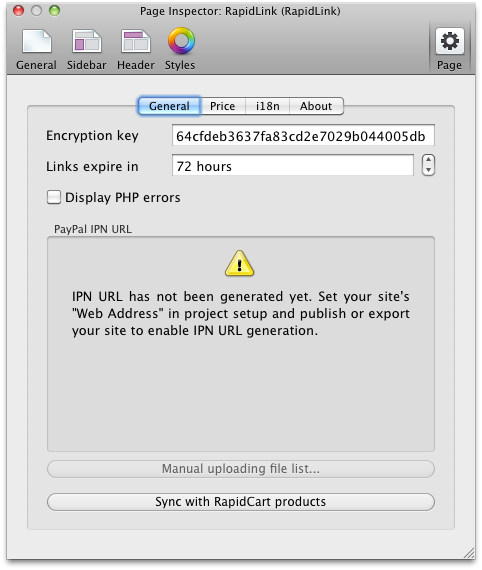
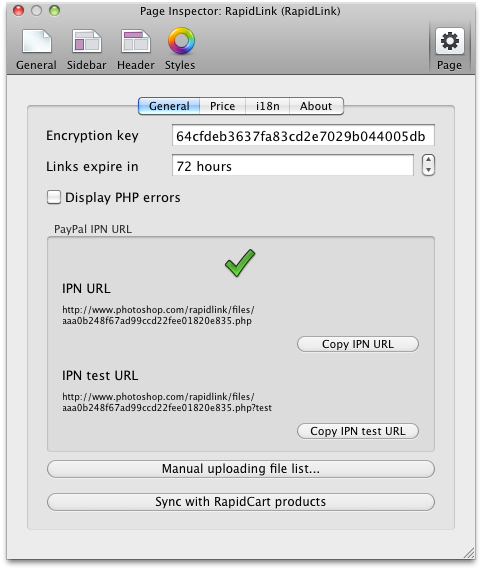
RapidLink Manual - GUI | Page Options > General

Previous: Adding a RapidLink page to your project
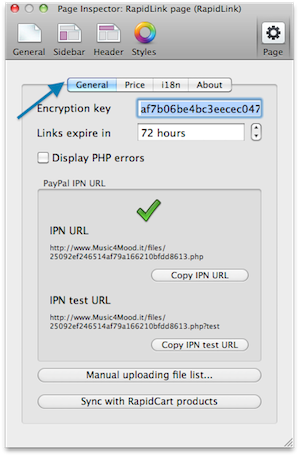
Here is the place to set up your RapidLink in order to communicate with your Paypal account.
Encryption key:

Write here a string that will be used by RapidLink to secure your data and URLs. You'll find a default value that you can modify as you wish.
Links expire in

Use the arrow tool on the right hand side to change the availability hours for links. After this period the customer won't be able to download the file.
Display PHP Errors

As RapidLink hardly uses PHP, you can tick this check to show alerts that can help you during the testing.
IPN
Instant Payment Notification (IPN) is PayPal's message service that sends a notification when a transaction has taken place. RapidLink handles this service for you. All you have to do is copy the IPN URL generated as you publish the site in "Selling Preferences" section of your Paypal account.
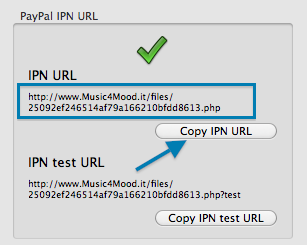
Login to your Paypal account and go to Instant Payment
Notification in Selling Preferences menu. (only for Premier and Business accounts).
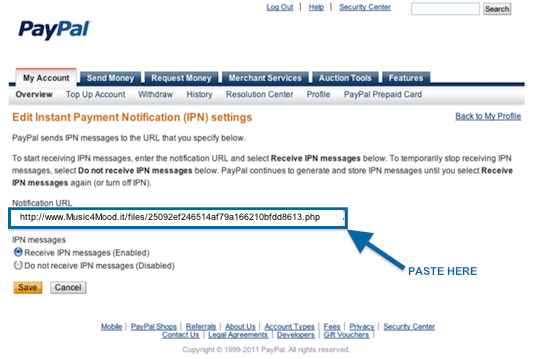
Paste the IPN URL that RapidLink generates into
Notification URL field.
Enable to receive IPNs and Save.
IPN test URL
Before using Paypal and RapidLink in the real world, you'd rather go testing using the offered test URL following our
step-by-step guide | Optional Step.
Next: Setting distribution mode
RapidLink Manual - GUI | Page Options > General | Setting distribution mode
Previous: Page Options > General
RapidWeaver can't handle huge files but you may still offer to your customer GB size files. RapidLink comes with a feature to let you do it easily.
Bigger files can be either manually uploaded to your server or hosted on a third party service (e.g. Amazon S3, Dropbox...).
Choose your preferred distribution mode from the pop up selection. Available modes include:
Embed file
content
, suitable for smaller files only
Host on external service, used to link files hosted on third party servicesManually upload file, needed to distribute bigger files hosted on your own server
Choosing a distribution mode different from Embed file
content, file content embedded into RapidLink saving is removed, if present. You'll need to drop a file to
re-enable this distribution mode.
Choosing Host on external service, you'll need to provide full URL pointing to your file.
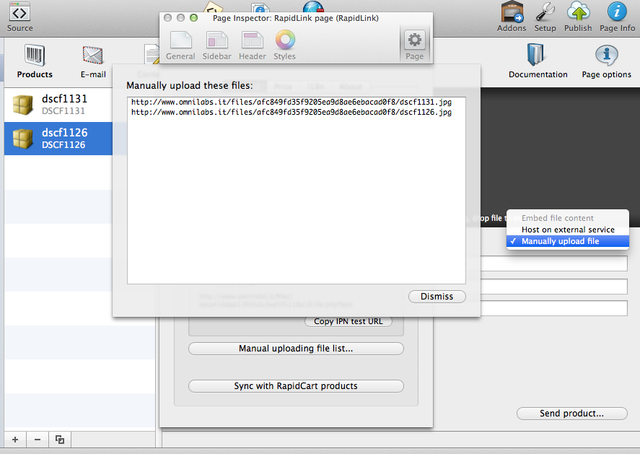
Choosing Manually upload file, you'll need to upload your file (in most cases using an FTP client) to your web server. File must be named exactly as shown in File
name field and placed in remote directory shown in manual upload file list.
Open Page Options > General and click to "Manual uploading file list..." for a complete list of files that need manual upload.
In order to upload your files, choose an FTP client and ask your hosting provider for access name and password. Make sure
your files are stored in the correct Rapidlink
folder (the one with the encrypted name e.g.
/rapidlink/files/e13919c210c64d6ebede2c578b635bfd/ ) and that you've permission to write/read this
folder.
Next: Uploading files through FTP Client
RapidLink Manual - GUI | Page Options > Uploading Files using FTP Client (FileZilla)
Previous: Setting distribution mode
Among all softwares or services (most hosting providers have their integrated FTP service) we choose FileZilla, a simple and free FTP client available for Mac here, to show how to upload huge
files in RapidLink manually in the correct position.
Once installed, open your FileZilla copy and enter hosting address, username and password (port if needed) and push
QuickConnect.
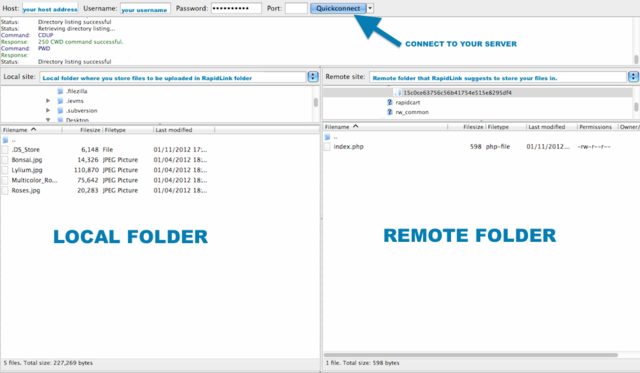
Use the Local Site arrow tool to find out the files you want to upload in the RapidLink project.
Open your RapidWeaver project. On the RapidLink page, click on
Page Options > General and push
Manual Uploading file list.
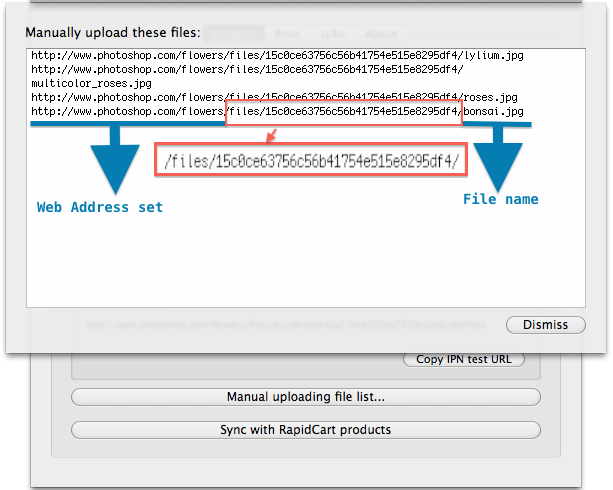
RapidLink lists the files you need to upload and also the exact place where you should put them.
e.g. http://www.photoshop.com/flowers/files/15c0ce63756c56b41754e515e8295df4/roses.jpg
- http://www.photoshop.com/flowers/ is the Web Address set for your project;
- roses.jpg is the file name
- /files/15c0ce63756c56b41754e515e8295df4/ this is the FOLDER you need to look for in the FTP client to store the files in.
Go to FileZilla and click on the right side; use the remote site arrow tool to browse the web space for that specific folder.
Once you've found it, simply drag and drop files from the left (local) to the right (remote).
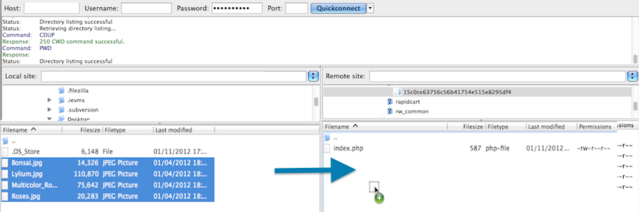
Wait for FileZilla to finish uploading (you can check task status above the local folder section).
Next: Syncing with RapidCart
RapidLink Manual - GUI | Page Options > General | Syncing with RapidCart
Previous: Uploading file lists
- IMPORTANT NOTE: This feature requires RapidCart 3 installed on your RapidWeaver copy.
Clicking the button "Sync with RapidCart products", your RapidLink page will inherit all products in ALL RapidCart
pages of any open project. Each different SKU represents a different product.
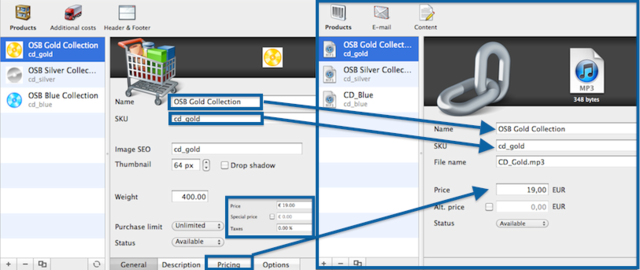
RapidLink imports Name, SKU, Price and Alternative Price of the synced products. The alternative price is the value calculated when a coupon discount is on.
Next: Changing Currency
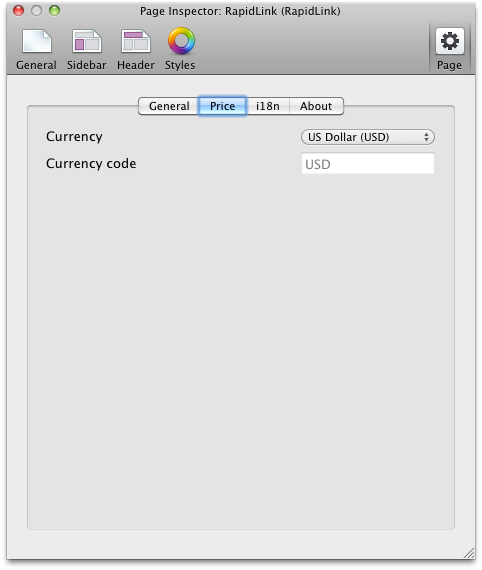
RapidLink Manual - GUI | Page Options > Price
Previous: Syncing with RapidCart
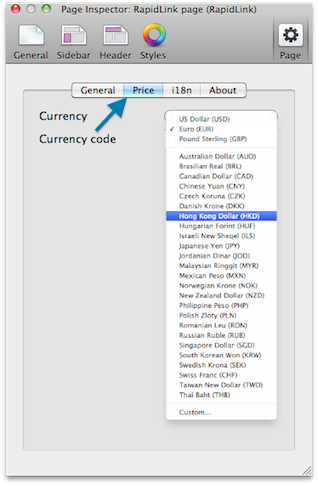
Set here the currency used on your RapidLink transactions.
Currency
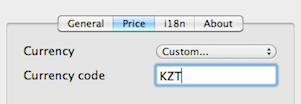
Clicking on the dropdown menu, you'll choose between the 28 currencies shown. Choose "Custom..." to set up your own.
Currency Code
This field displays the three letters code of the selected currency. If you choose "Custom...", enter here the three letter of your own custom currency.
Next: Internationalization
RapidLink Manual - GUI | Page Options > i18n
Previous: Changing Currency
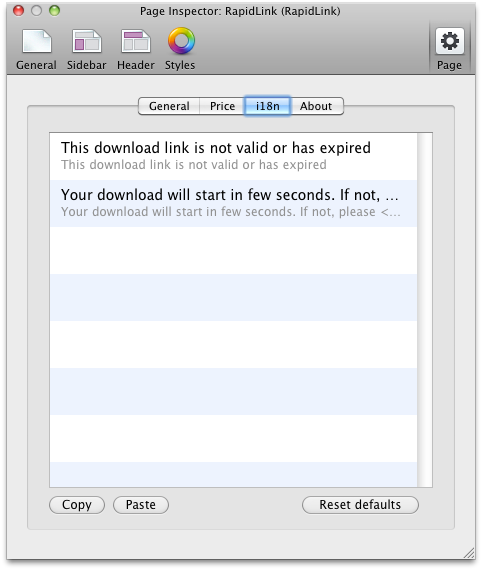
There's two dynamically generated strings into the download page where customer is redirected after receiving the notification mail.
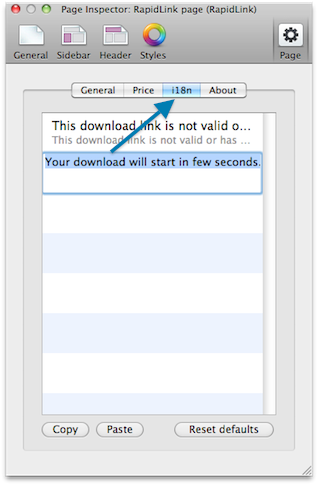
One when the link expires or is not correctly generated:
This download link is not valid or has expired
..and one when everything's ready for the download:
     Your download will start in few seconds.
     If not, please <a href="%LINK%">click here</a>.
where %LINK% is the dynamically generated link for the
download.
Double-click on each field to insert a customized text or to localize the strings.
Copy / Paste strings
To export the customized strings to other RapidLink pages, click on "copy" to copy to the clipboard. "Paste" will take values from clipboard and substitute the one in the two fields.
Reset to default

Click "Reset Defaults" to upload the original RapidLink strings.
Next: Information About RapidLink
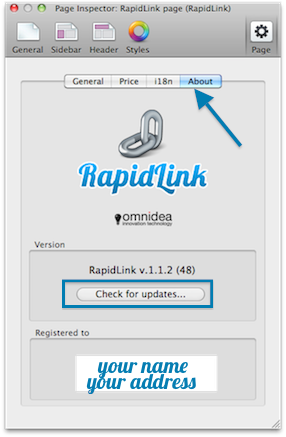
RapidLink Manual - GUI | Page Options > About
RapidLink Manual - GUI | Adding Products to your RapidLink Page

Previous: Page Options > About
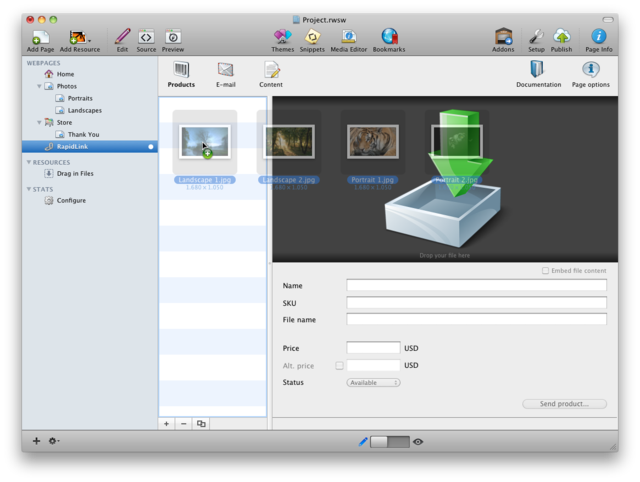
Adding Products by Dragging and Dropping
RapidLink lets you easily add your products by dragging them into the products menu. Product name and SKU will be automatically updated mirroring the file name.
- NOTE: Your files will be uploaded as you publish. If your files are very big (e.g. 1GB) they can cause problems, so we'll suggest to upload them manually using FTP as explained in
this FAQ.

Uncheck "Embed file content" in this case.
Adding files manually
If you prefer, you can add products on your own through the edit buttons:
 : Use this button to add one product.
 : Use this button to delete the selected product.
 : Use this button to create a copy of the selected product; this will copy all details from the source product (name, SKU, price etc..).
Set all the details you need for each selected product:
Name
This is the product name your customer will read above the description.
SKU
This is the Stock Keeping Unit, the code that identify your product for stock management. SKU value is needed to identify products and it doesn't show in description page but only in cart invoice.
File Name
This is the original file name with extension. Remember that if you choose to upload the file using FTP, this value should match the name of the file uploaded.
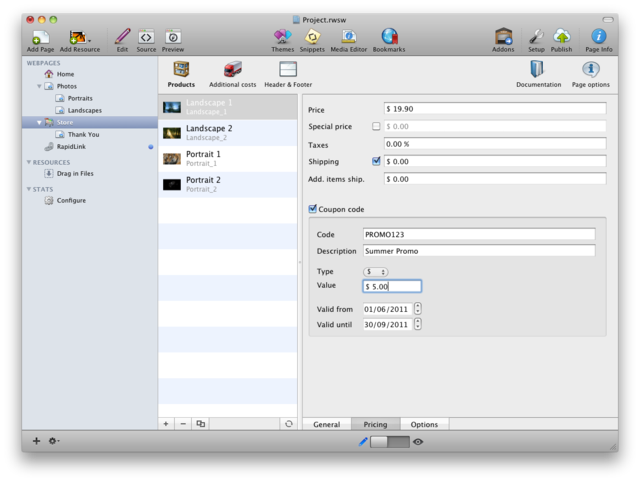
Price
Set here the selling price. Price currency is shown on the right. If you wish to change it, open Page Options > Price and choose among available currencies or customize your own.
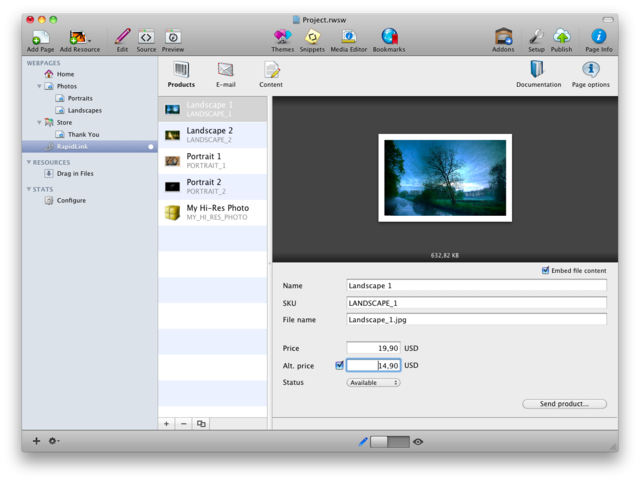
Alt.Price
Set here an alternative price for the selected product: as RapidLink checks purchases by comparing due and paid amounts, here is the place to put your promo price.
Status
Update here the status of you product. Setting it to "Disable" by using the drop down menu will display a Stop sign in the product edit menu.

- NOTE: if you're using RapidCart as your cart solution and the Sync feature as well, you'll notice that the unavailable product will not display on your page after republishing.
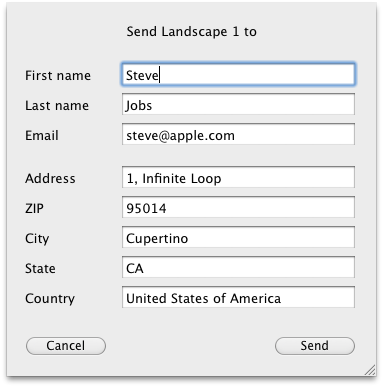
Send Products
You can choose to send complimentary files to your customer using this button. Select the product you wish to send and push "Send Products" button; the following window will appear.

Fill First Name, Last Name, Email address and other address details with your customer information and push "Send" button.
- NOTE: You can do this only after publishing because this function uses codes on your server side. If you encountered any problem at this point, please check your hosting provider supports PHP 5.x and that you have write access to
rapidlink folder on your hosting server.
When everything's gone right, this alert will show:
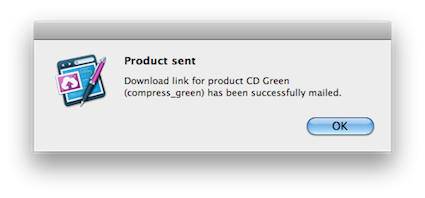
Your customer will receive an email with the secure link to download the product.
Read next page for further information about customizing the email.
Next: Adding a list of codes
RapidLink Manual - GUI | Adding a list of codes to your RapidLink page
Previous: Adding products to your RapidLink Page
Enter a list of codes
You may need to sell license keys, vouchers or any kind of "text-based" information. RapidLink lets you easily do by dragging and dropping a .TXT file that has one code (e.g. key or voucher or coupon) each row to the Product Area.
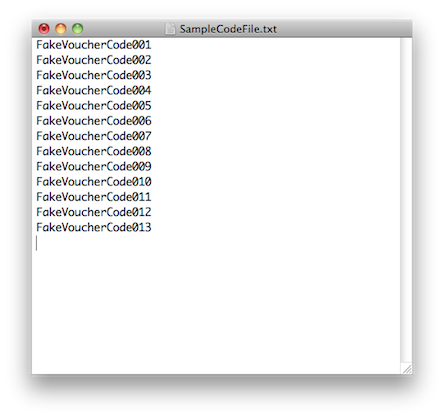
Download the sample txt file
RapidLink will look at the first row, send it to the customer and then update the file deleting the sent value.
- NOTE: you don't have to worry about missing codes because RapidLink alerts you by dropping an email when you're running out of codes.
Make sure you're using a TXT file, not a .rtf, .doc or other formatted type of file.
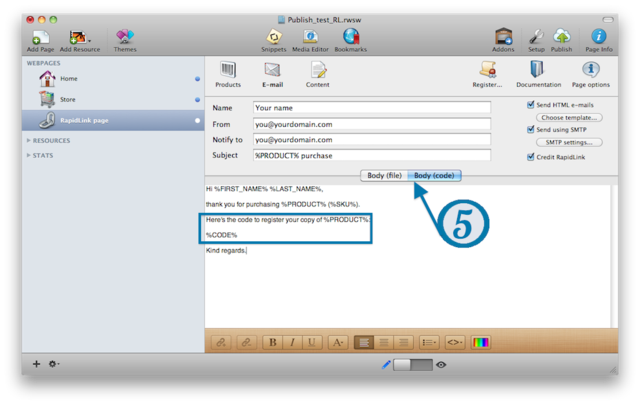
Use the "Code" email template if your selling codes then, as explained
here
Next: Setting Emails
RapidLink Manual - GUI | Setting and customizing emails

Previous: Adding Products to your RapidLink page
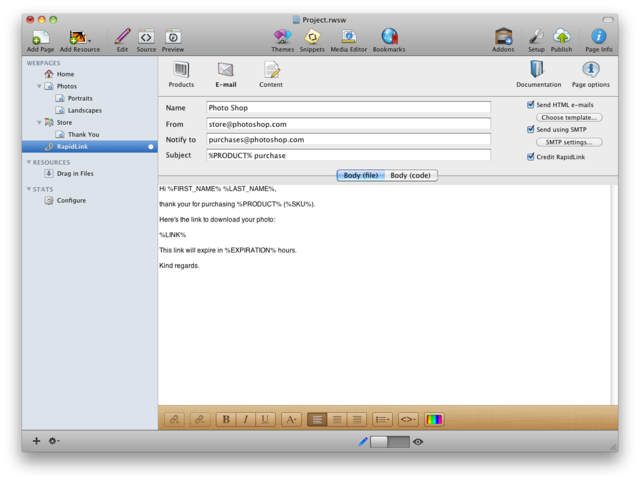
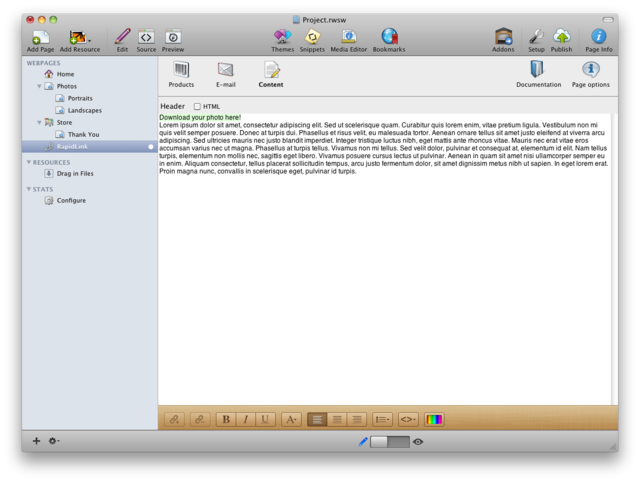
As RapidLink communicate with your customer through notification emails, here is the place where you can add information, instructions and whatever you think you'll customer need to know before downloading from you.
-
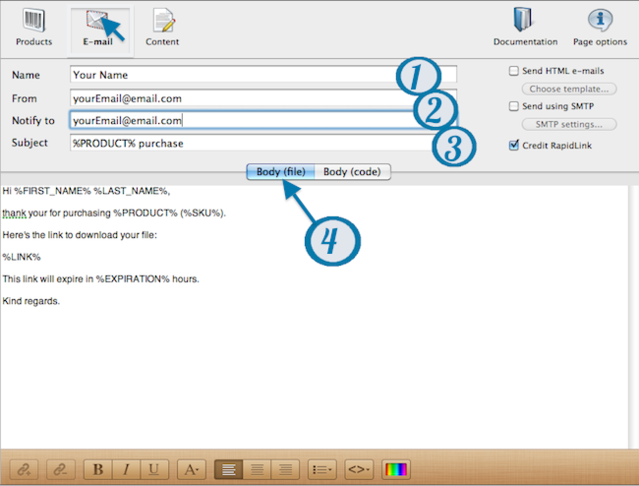
Name: enter your name (1) or your company name in the first fields. This shows as the sender of your emails.
-
From: enter the email that your customer will display as sender and maybe reply to.
-
Notify to(2): enter here the address where you want to receive notification for your downloads.
If you're selling codes, select Body(Code) to customize the proper email (5):
Smart Tags
RapidLink allows you to handle informations from your customer dynamically generated after the purchase. Reading the default notification email text you can notice some %[..]% strings: these
Smart Tags will be substituted once the order from the customer has been received. Here are values they substitue:
- %PRODUCT% Product Name
- %FIRST_NAME% Customer First Name (e.g. John)
- %LAST_NAME% Customer Last Name (e.g. Smith)
- %SKU% Product SKU Value
- %LINK% Generated link (secure) for the download
- %CODE% Code uploaded from the list of codes
- %EXPIRATION% Hours amount set in
Page
options
> General > Links Expire
in .
Customize email subject and content through the Edit bar at the bottom of the page. For further description of this tool, refer to
RapidWeaver manual in "default Styled Text
section".
This is the place also for localizations if you have more pages with different languages or simply want to translate the email.
Next: Emails HTML templates
RapidLink Manual - GUI | Setting HTML email templates
Previous: Setting and customizing emails
Sending HTML e-mails
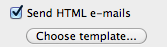
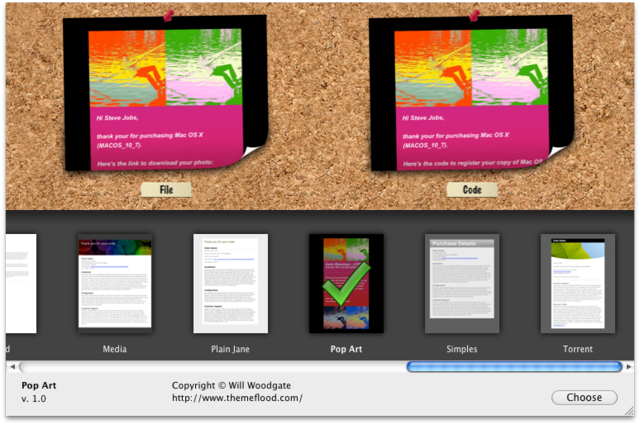
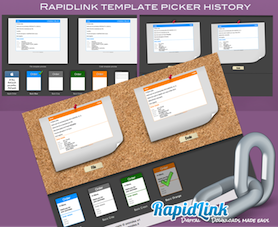
Check HTML e-mails to use HTML emails instead of simple text emails. Push "Choose template" to open RapidLink email template picker.
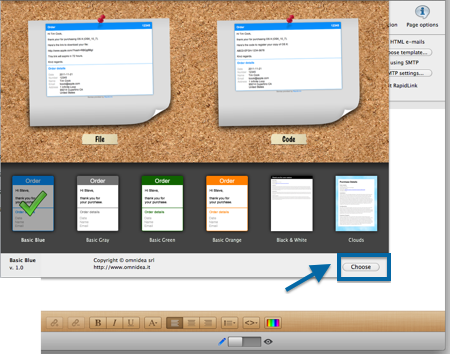
Choose among different styled templates for your emails. Some of them are gently provided to you by ThemeFlood.
The picker will preview the email as you change the template.
After that, you need to save and republish your project in order to see your changes.
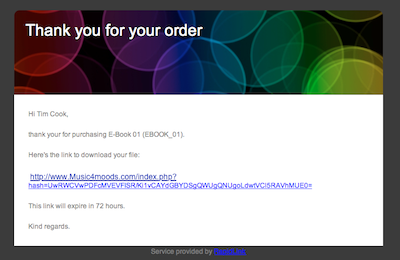
Now all mail clients that accept HTML email show your nice-looking emails.
Next: Sending emails through SMTP
RapidLink Manual - GUI | How to send emails using SMTP
Previous: Setting HTML email template
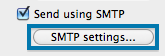
RapidLink normally sends emails using the hosting server default service. If you wish to change this behaviour, tick the "Send using SMTP*" check and set your SMTP details by clicking the "SMTP settings" button.
* SMTP (Simple Mail Transfer Protocol) is a set of standard Internet procedures by which two email providers (ex. Gmail, Yahoo Mail), transfer email messages to one another�s mail servers.
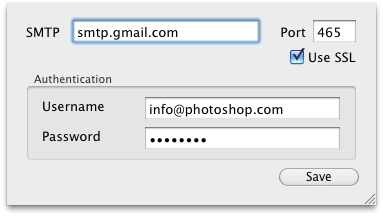
This will prompt a panel that you can fill in with the chosen SMTP settings.
Fill the fields with:
- SMTP smtp server name (1)
- Port default value is 25 (ask your smtp provider service if it needs SSL authentication or other ports) (2)
- SSL tick this check to use Secure Socket Layer for email (some providers need it) (2)
- Authentication: Username your login name for the smtp service (note that most require also the
@domain.com part of your email address) (3)
- Authentication: Password the password you use to enter the smtp service. (3)
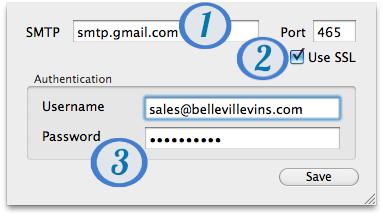
Then click on "save" to enable your SMTP settings.
Now your customer will receive emails from this
account.
- IMPORTANT NOTE: If you have tried the above steps and continue to have problems sending mail, your Internet service provider (ISP) may not allow its users to send messages with other companies' SMTP outgoing mail servers.
Credit RapidLink
Un-tick this check if you don't want to credit RapidLink on your site.
Next: Adding details to download page
RapidLink Manual - GUI | Adding details to download page

Previous: Setting an external SMTP
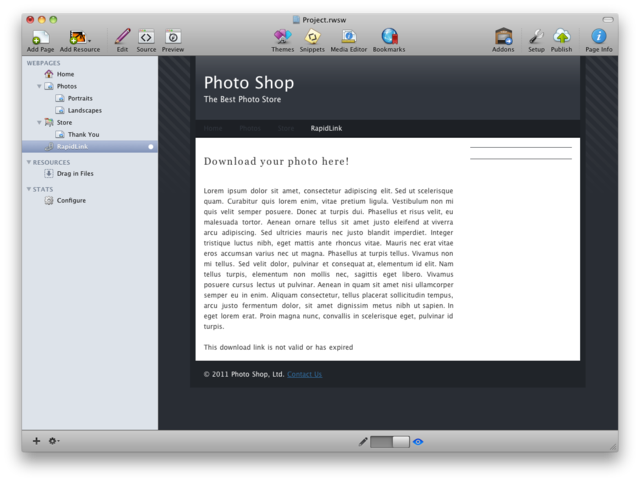
When your customer receive the email with the link, they'll be landed to a page.
Rapidlink lets you customize this page adding text, images or HTML tags through rich text edit tool. Refer to
RapidWeaver manual in "default Styled Text section" for further details on how to use it.
Tick the HTML check if you prefer to use HTML tags for the content.
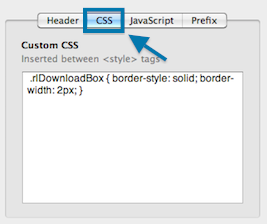
Customizing the download box
Link displayed on the download page is embedded in a
.rlDownloadBox CSS class.
Open Page Options > Header >
CSS and edit this class property to customize it.
For further details see
this FAQ.
Previous: Setting an external SMTP