Enable the "Custom layout" option in Style panel to modify the HTML product source code or add your CSS rules in page Header/CSS field.
RapidCart requires RapidWeaver 6.x or higher.
RapidCart pages work on most official and third party themes and on most modern browsers.
Please try the demo before purchasing it.
PHP 5.x or higher is required for Direct Order (enabling Unique ID requires PDO classes to be enabled) payment and Coupon Codes (
RecursiveDirectoryIterator class needs to be enabled)
Maximum 2 products per page.
Unregistered warning message in the exported page.
RapidCart 3 is a free upgrade for customers who purchased RapidCart after March 31st, 2011.
If you are eligible but haven't received your free license yet, please contact our support
system.
Others can get the upgrade at the omnidea store.
Please take a look at our April newsletter for further details.
You can download the latest RapidCart 2.x version here.
RapidCart 2.x users with valid license can upgrade to RapidCart 3 on omnidea store paying the upgrade fee of only � 14,95.
Visit RapidCart 3 official page to discover what great features are you missing by staying with RapidCart 2.x!
SKU is the acronym of Stock-Keeping Unit, a unique identifier for each distinct product and service that can be purchased, enabling the merchant to systematically track their inventory, such as in warehouses and retail outlets.
SKUs are used for
management purposes only and are required with Coupon Codes and E-junkie support.
Sure!
RapidCart integrates with RapidLink, our plugin specifically designed to handle digital goods delivery.
Moreover, RapidCart officially supports E-junkie.
Follow instructions in RapidCart manual in order to enable E-junkie support.
After installing RapidCart, you need to restart RapidWeaver.
If you get this error running Direct Order:
Parse error: parse error in [some path]/rw_common/plugins/rapidcart/rapidcart/orderMailer.php on line 74
it means your web server doesn't support PHP 5 as required by RapidCart.
On previous version of RapidCart we changed the way RapidCart saves your cart.
To fix the problem, delete RapidCart cookies on your browser.
RapidCart features a cross-page site-wide cart (that is, cart content is automatically carried on and shared through different RapidCart pages).
Please keep in mind this feature is enabled only for published RapidCart pages. While in preview mode, cart content is emptied every time a RapidCart page is generated.
Enable the "Custom layout" option in Style panel to modify the HTML product source code or add your CSS rules in page Header/CSS field.
Click "Copy template to clipboard" button and paste the source code in the Header field of other non-RapidCart pages.
For further details follow the step-by-step guide in RapidCart Manual.
Rapidcart intensively uses JavaScript libraries and other resources.
Importing one or more RapidCart pages with Stacks, Blocks, PlusKit or other "cross-page" plugins could corrupt the correct behaviour.
This is not a RapidCart problem.
We advise you against this practice, or, at least, we suggest you to test your website before publishing.
RapidCart supports all currencies.
Despite that, PayPal and Google Checkout supports a subset of these currencies only.
Before publishing your page, make sure your preferred payment system supports your currency.
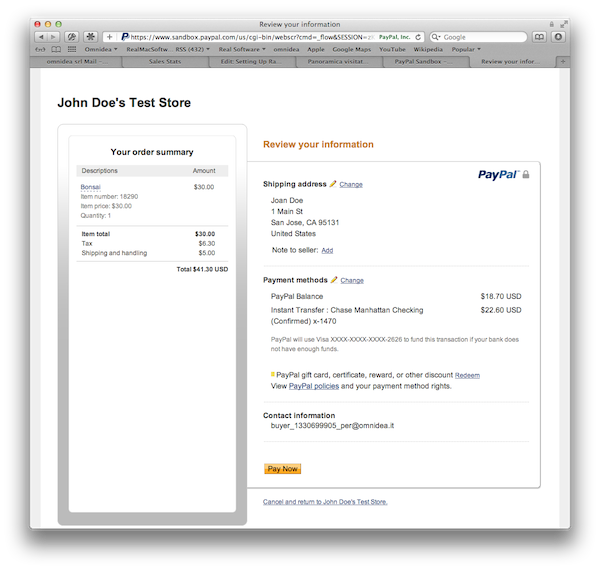
The PayPal sandbox allows you to process transactions on your website, without the official exchange of money.
Enable this feature to work with RapidCart: go to Page
Options > Checkout and choose Paypal as payment gateway. Tick the Enable sandbox flag.
(Available on RapidCart 3.2 or higher)
Publish the site. Now each transaction goes to https://www.sandbox.paypal.com instead of https://www.paypal.com after checkout.
For further details on "How to test RapidCart through Paypal Sandbox" see manual.
What's the size of your project?
We've been reported about RapidWeaver hangs when handling really big site savings (~1 GB+).
Please check that you're on latest RapidWeaver version and try running File > Normalise images... before saving and / or using smaller images (i.e. resized outside RapidWeaver).
As a last resort, you may split your site into multiple Rapidweaver savings.
Your PHP setup does not support PDO extension.
Uncheck Enable direct order unique ID in Page
options > Checkout > Direct Order
Mode > Customize... and republish your page(s).
No, they don't.
Paypal offers "Account Optional" feature to let customers purchase through Credit Cards.
On your PayPal account go to "My Profile" > "My Selling Tools" > and Update "Website Preferencies".
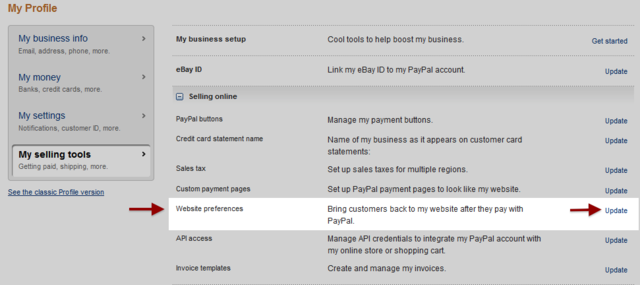
Search for "PayPal Account Optional" and turn this feature "on" if it doesn't.
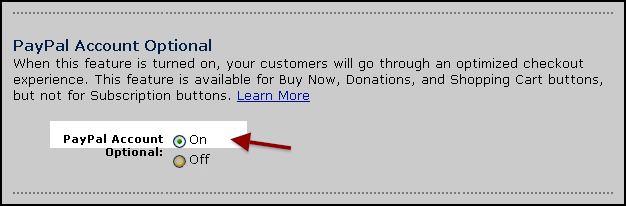
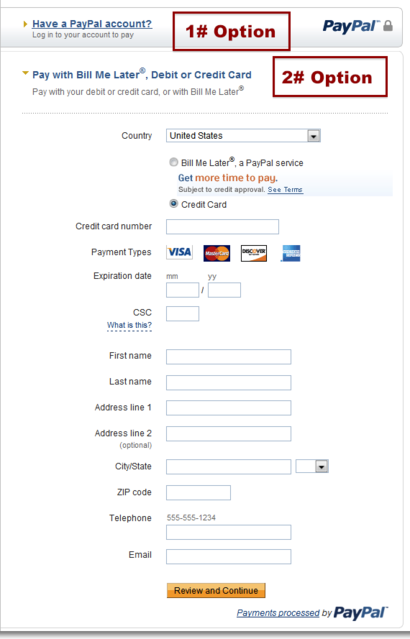
Now when customers checkout through your Paypal-based shop, they can choose whether to use their Paypal account or pay through Credit Card.
If you correctly set up coupons (with SKU values for all products and PHP running on your hosting account) and they won't work, please ask your hosting provider if it supports "recursivedirectoryiterator" class.
If it doesn't, you won't be able to use coupons.
Customers has reported that Godaddy hosting provider does not support "recursivedirectoryiterator" class with their standard economy hosting.
They said also that upgrading to a dedicated server will fix the problem.
RapidCart doesn't handle two different shipping rates for the same shop.
You can creates two different RapidCart pages (with different Shipping and CartID) and redirect your customer to the correct one.
An alternative is to set off the shipping in RapidCart
and set it into the chosen payment gateway (If available).
RapidCart doesn't handle different tax rates depending on the customer nationality.
You should zero taxes in RapidCart and set them directly in your chosen Payment Gateway.
Login to your Paypal account and go to your "Profile": you'll find Sale Tax menu. Here you can set your domestic and international tax rates depending on the specific Country.
Login to your account, click the "Settings tab". Click "
Tax setup".
* U.S. only: Select a state from the drop-down menu and enter the appropriate tax rate. Select "items
only" or "items and shipping" from the "Apply
to" drop-down menu. Click "Add" to save your changes.
Repeat these steps for each state and tax rate you'd like to specify.
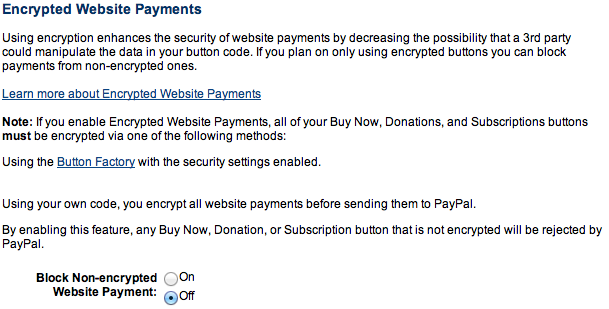
You've set Encrypted Website Payments in your Paypal account.
To set off Encrypted Website Payments in your Paypal account, enter in your "Profile". Click "My Selling Tools" and Update "Website Preferences".
This problem appears when a theme forces max-width of all images that are in the page.
In order to fix it, please copy the following code and paste it in Options->Header->Css window.
.rcItemThumb img { max-width: none !important; }

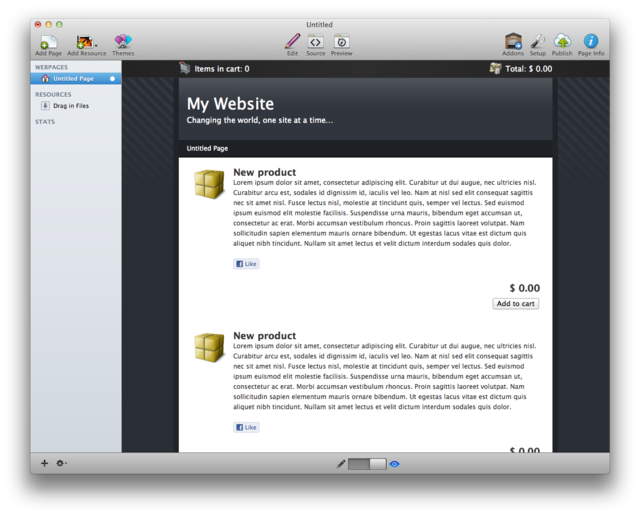
RapidCart is a plugin for RapidWeaver. It allows you to easily create an e-commerce page on your site. Add one or more RapidCart pages to your site and enjoy the slick and fully customizable cross-page AJAX cart that the plugin will automatically generate for you!
You don't need a specific server-side support to start your business. Thanks to the simple and friendly interface, RapidCart 3 lets you create a store with no complicated settings. Just drag your products into the edit area and arrange them however you like.
It's not rocket science! Focus on your sales and not on technical details.
In just a few clicks, you can turn your web-site into a perfect store. Checkout through mutliple trusted payment systems. All without monthly fees.
You can purchase your copy of RapidCart through omnidea web store (which is made with RapidCart!) or try it for free downloading RapidCart Demo Version.
RapidCart requires RapidWeaver 6.x or higher and an Intel-based Mac. You can buy your RapidWeaver license from Realmac Software store (RapidWeaver 6.x requires Mac OS X 10.9 or greater, 50 MB disk space). RapidCart pages work with most official and
third party themes.
Your hosting provider should run PHP 5.2 or higher to support DIrect Order payment and coupon codes.
RapidCart is a shareware. Before you purchase a RapidCart license, please spend time to test it in Demo mode. You can download it from the RapidCart page.
NOTE ABOUT DEMO: All of the features of RapidCart are active, but for a limited number of items (two per page). To use RapidCart without any limitations, you have to purchase a license. Once you've purchased a license and registered
it into the plugin, all the limitations are removed. You don't even have to download anything new, the copy you've already had will be unlocked.
To purchase a license visit omnidea store. Your license file will arrive via email just a few minutes after you complete your purchase.
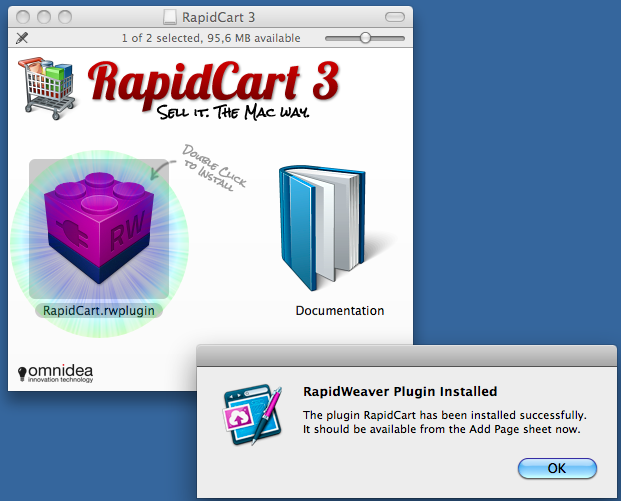
Double-click on RapidCart disk image to open it. Clicking on the RapidWeaver plugin icon will start your installation process. Check the omnidea knowledge base by clicking the "documentation" icon.
##Registration through license file or code
Please read the General FAQ on registration.

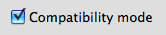
The right way to use license file is to save it into a Finder folder and drag it to the registration window as explained in the previous paragraph. Do not drag RapidCart image you downloaded from omnidea web site to the registration window, but double-click on it to install in RapidWeaver. Wrong files dropped into the registration window will show an X Sign as the picture below shows.
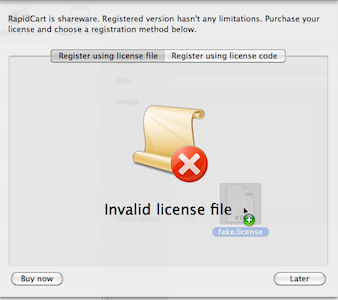
If you�re using a webmail do not drag the license icon to the registration window directly: web browsers may not properly download the attached file. Save attachment instead and then drag it from a Finder folder to the registration window and it will work fine.
Previous: RapidCart Requirements and Installation
Once installed, add a RapidCart page to your RapidWeaver project by clicking the + button on the lower-left corner of the first RapidWeaver window(1). The "Add Page" sheet drops down and shows you all types of pages available. Select
RapidCart (2) from the list and then click the "Choose" button (3).
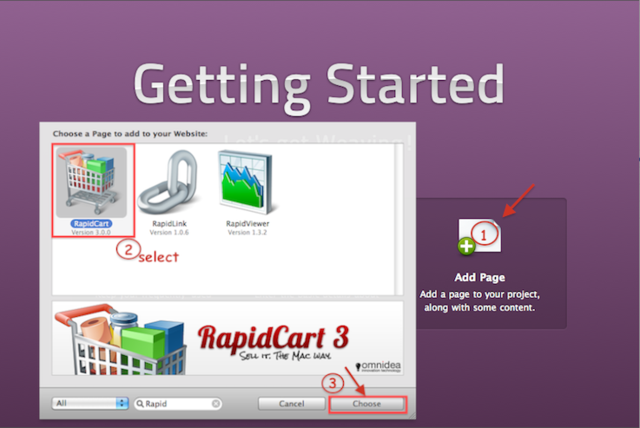
RapidCart Panel will appear.
![]()
Previous: Add a RapidCart page
In the Page Inspector window, you can further customize the settings for cart.
Click on `Page Options icon to open it.
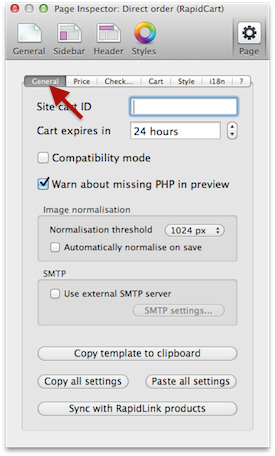
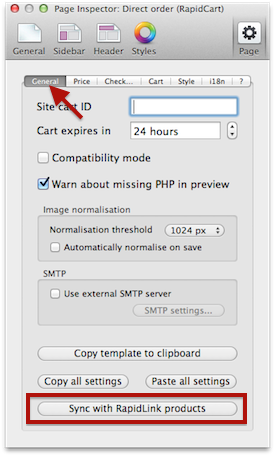
This tab provides a way to change general setting for the RapidCart cart page.

Cart content is automagically shared across multiple RapidCart pages. If you prefer to have separate cart content, set a different cart ID for each RapidCart page.
RapidCart allows you to have more than one cart on your site to manage different ways of payment or options for each of them. We suggest you to create the first RapidCart page and set all options, shipping, taxes and cart ID and then duplicate your page for all pages you want to share the same cart and purchase settings with.

Put a value from 0 to 240 hours in this field. After this timeset, the cart will empty. Use arrow tool to increase/decrease the default value (24hours).
Check this box if you found out some layout problem with your theme.

Tick this option to see an "alert" while previewing your project: if you're using coupons or Direct Order as payment option it will warn you that PHP commands related need an online server to run. Enabled by default.
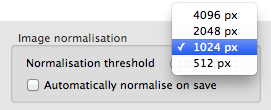
Save space on your hosting server by normalising images. You can set a specific image size through the arrow tool. Enable
Automatically normalise on save if you'd like to reduce images size at each saving.
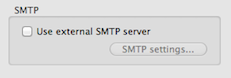
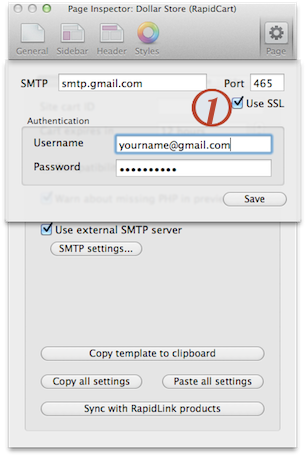
Tick this option to set an external SMTP as outgoing-email handler. To insert your SMTP server settings, push the SMTP
Settings button. Insert the address of your SMTP (e.g. mail.google.com) and your login credentials. If you or your server need a safer port, enable the SSL protocol(1).

If you want to display the cart in some non-RapidCart pages, click on the �Copy template to clipboard� button in the RapidCart page options. Then open the page you want to edit, click on Page Inspector > Header >
Custom Header and paste the source code. See detailed
step-by-step guide on "how to add the cart to non-RapidCart pages".

You may have a huge number of pages born from duplicating a source one and you may want them to share same options over changing. This is what �Copy all settings� and �Paste all settings� buttons are for: change whatever you need to change in source �Page Options�, copy all settings; go to the �Page Options� of the destination page and press �paste all settings�.
![]()
Previous: Page Options > General
As you set up a RapidLink page (see RapidLink Manual for further details), you need to create a RapidCart page to let customers purchase this products.
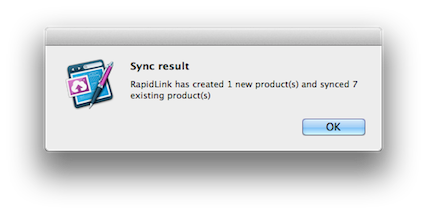
You may also have both type of products in the same page, and get information about digital items without you to do a thing: just push the "Sync with RapidLink products" button.
RapidCart will import Name, SKU and price of every RapidLink product. This avoid you to fill this field by your own and keep them update.
Next: Page Options>Price
![]()
Previous: Page Options>General | Sync with RapidLink
Price tab provides you an easy way to set currency attributes and tax rates.

Default currency is Dollar($); to change it, just click on the drop-down menu and choose between the available currencies. Furthermore, you can customize your own currency by choosing "Custom" and adding currency code and symbol.
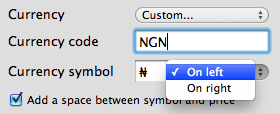
Use drop down menu to show currency symbol on the left or on the right of amount. If you need to add a space between price and currency symbol, just check the related box.
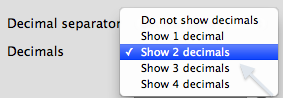
You can set decimal separator between ","(comma) or "." (point) accordingly to your currency default use. Use drop-down menu to select how many decimals will be shown after separator.

Increase or decrease default tax rate using the stepper control. If you choose to show prices with tax value included, just check the related box.
![]()
Check-out options menu provides you the way to manage ways of payment in the cart page.
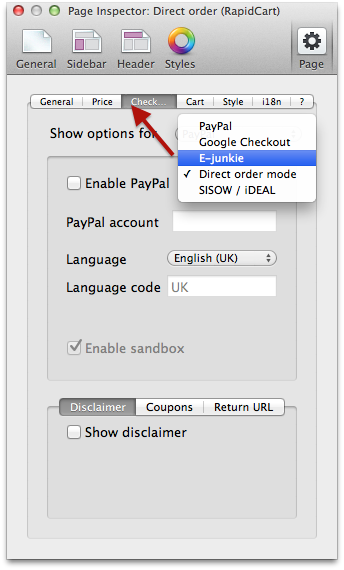
Menu will vary depending on payment service you chose (you may choose all 5 types available).

As you display PayPal options, enable PayPal way of payment checking the box. Fill
the �PayPal Account� field with the e-mail linked to your PayPal Account and choose the language of the check out page. You can also customize language and language code to insert the one you prefer.
Enable Sandbox if you're going to test the
cart through Sandbox test accounts.
##
How
to set and test RapidCart with Paypal

As you display Google Check-out options, enable Google Check-out
way of payment checking the box. Fill the �Merchant ID� field with your own ID (you got this information registering your Google Check-out account).
##How to set RapidCart with Google Checkout

As you display E-Junkie options, enable E-Junkie way of payment checking the
box. Fill the �Account� field with your E-Junkie client ID information.
###90-days Promo 
Click here before signing up for a new account on E-junkie. Enter the exclusive RapidCart users Promotional Code to get 90 days Free trial rather than 7 days.
##How to set RapidCart with E-Junkie
![]()
As you display Direct Order option, enable Direct Order way of payment
checking the box. Take care of having installed on your server domain a PHP 5.2 or higher version for this to work correctly. Fill the �Send To� field with the e-mail address you want your order to come to and the �Email Subject� field with subject
your order will have. You can write down on the text-area below a standard text for your e-mail or you may leave the default one (see Customization section for further details). Push the button �Customize Fields� to change or add fields on check
out page.
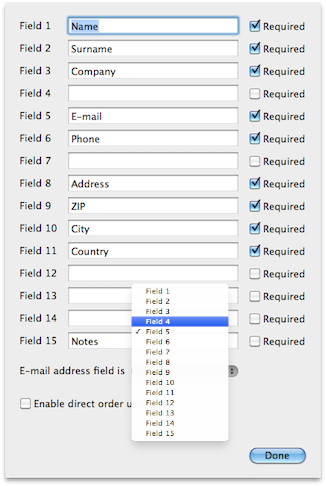
There are up to 15 fields your customers may fill with informations during check-out and you can set which of them has to be required checking related box. As default you�ll find nine required fields such as Name, Surname, Company..etc: double clicking on each label, you can customize it. Remember to define which field correspond to customer e-mail address using the arrow tool: it�s fundamental to give the correct information to server service.
Checking this box, you�ll be offered to enter a Unique ID prefix for your order: this let's you track your orders and archive them. For example, writing �t_shirt� as prefix you'll get �[t_shirtyymmdd/n] on the subject, where �yymmdd� stands for last two digits of year, month and day and �n� is the sequence number (for a T-shirt order made in 01/01/2010 you will receive an email with this string as subject �[t_shirt100101/1] New order from website�).
* (PDO Classes represent a connection between PHP and a database server)

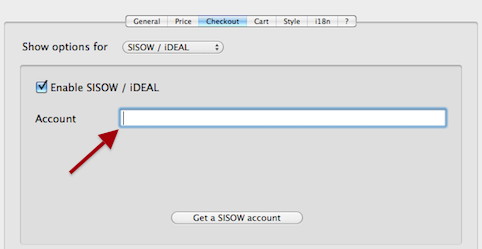
As Dutch people get used to iDEAL payment gateway, RapidCart implements it for them through Sisow. Fill in the account field to use it in your RapidCart page.

If you don't have one, get it by clicking on "Get a SISOW Account" and filling the form in Sisow site (in Dutch).
##How to set Sisow/iDeal/Mister Cash/Sofort Banking with RapidCart
![]()
RapidCart lets you use Paypal payment gateway.

You will enter the email address you're using for this account to set RapidCart.

You can set a different language for the Paypal checkout page (accordingly to your site language) or keep the "Automatic" value to inherit the Paypal Account language set.
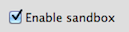
Check Enable sandbox flag on RapidCart Page
Options > Checkout Panel to test Paypal transactions with RapidCart using Paypal Sandbox fake accounts.
![]()
Set RapidCart to use Paypal as payment gateway.
Page
Options
> Checkout (Paypal) before proceeding with tests. Otherwise, Paypal Sandbox transactions won't work.
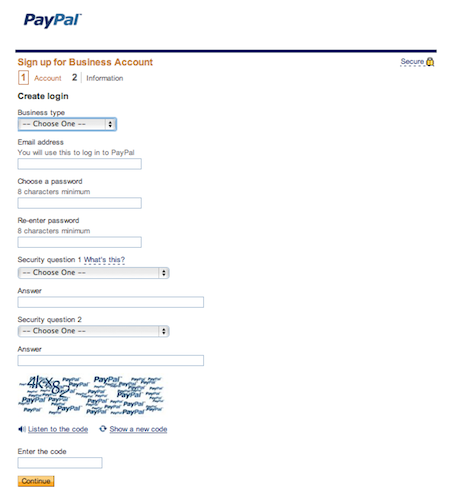
Access your Paypal developer account or create it if you don't have one here.
Go to Test Accounts and create fake accounts to proceed transaction on your store.
Paypal Sandbox lets your create seller and buyer accounts.
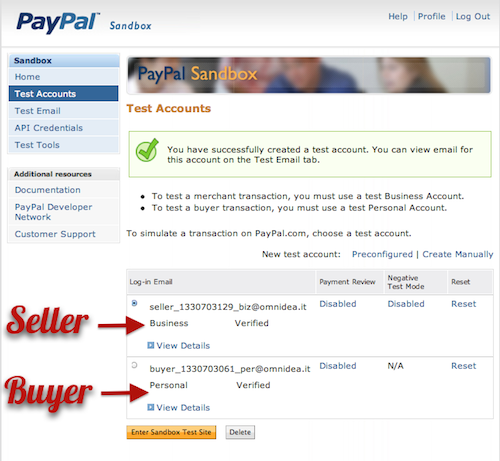
Once you've created a seller account, paste the email address related into Page Options>
Checkout (Paypal) > Paypal account field. Use the seller account to verify the checkout page and layout settings.
You can use your real Paypal seller account in RapidCart instead and proceed transaction with a fake sandbox buyer account. In this case, you'll verify that transactions correctly arrive on your account.
Go to "https://www.sandbox.paypal.com" and login using your seller or buyer credential to verify transactions.
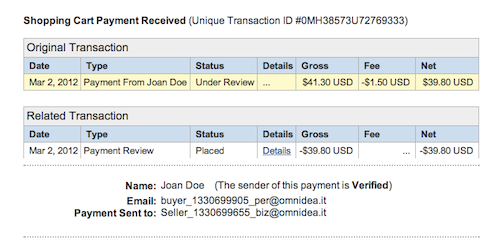
NOTE: RapidCart will treat sandbox buyer and seller accounts as real accounts.
If everything's fine, set the real Paypal
account in RapidCart into Page Options>
Checkout (Paypal) > Paypal account field, save and republish.
![]()
RapidCart lets you use Google Checkout as payment gateway.

Login you Google Checkout account or sign here if you don't have one.
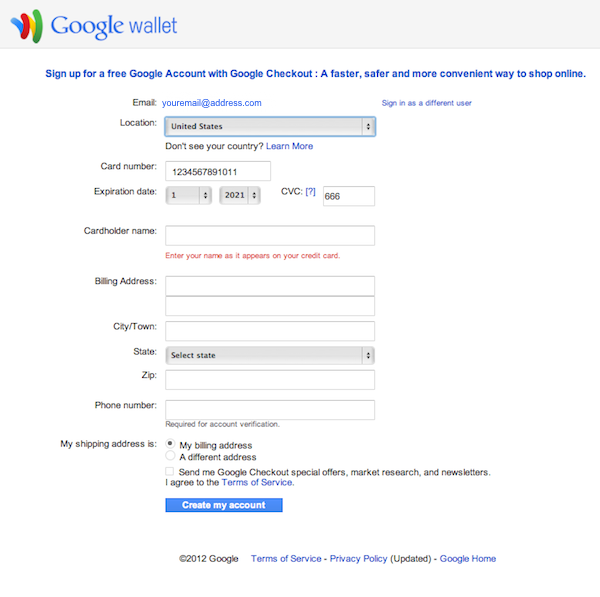
Once you've log into your account, get the Google
Merchant ID from Setting> �ntegration` as you can see in the following screenshot.
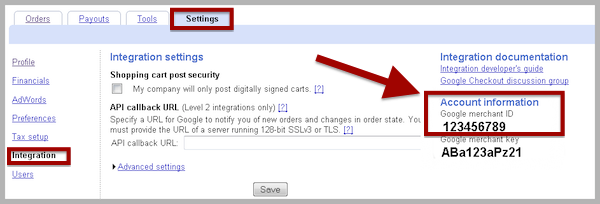
Go to your RapidCart page. Enter this information in
Merchant ID field you find in Page
Options> Checkout selecting Google Checkout as payment gateway.
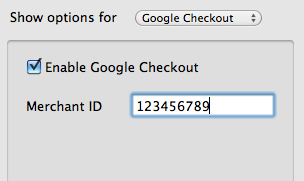
Now you're ready to sell through your Google Checkout account in combination with RapidCart.
![]()
RapidCart lets you use E-Junkie payment gateway.

You can register here to get an e-Junkie Account. After the confirmation process, you'll receive a
E-junkie Client ID. This is the value to set in RapidCart Page Options> Checkout panel to link your E-Junkie account to the store.
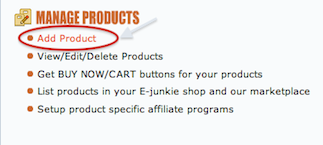
RapidCart in combination with E-Junkie allows you to easily sell your digital downloads. When your RapidCart e-commerce page is ready, login into your E-Junkie account. For each product in your page you have to fill in the information in your account: click �Add Product� as follow.
Enter product name, taxes value, VAT, price and currency.
NOTE: Mind that your customer will pay the price you set here in E-Junkie account, even if in the RapidCart page is different. So both prices have to be the same! Pay attention to maintain the same currency also. 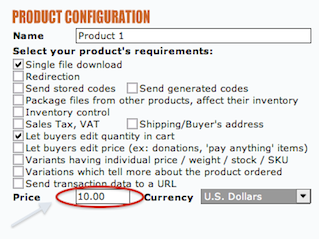
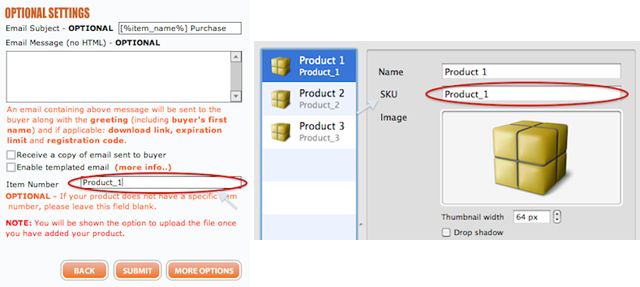
NOTE: E-Junkie recognize products coming from the RapidCart page via �SKU� value: so keep in mind to fill in the field �Item number� in your E-Junkie account with the exact SKU value. For example, if you have a product called
�Product 1� with SKU value of �Product_1�, then to correctly have the product set in E-Junkie, write �Product_1� into item number field.
Fill in information for each product in the store page. Double check all your products are submitted : you can do this through the
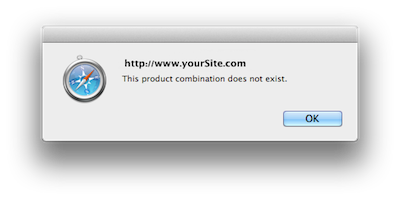
E-Junkie� product management menu clicking on �View/Edit/Delete products�.
NOTE: in case a product in the cart won�t match a product in the E-Junkie account, the customer won�t be able to pay for it during E-Junkie confirmation process...and you will loose a purchase!
![]()
RapidCart lets you use iDEAL payment gateway through Sisow.

Remember to choose RapidCart as shopping cart solution.

After creating a Sisow Account, open your RapidWeaver project. Open PageOptions > Checkout tab in the RapidCart page. Select Sisow/iDEAL from the select tool and enter the Sisow/iDEAL Merchant ID into the Account field.
Now your RapidCart-based shop and your Sisow/iDEAL account are connected.
![]()
Previous: Page Options >CheckOut
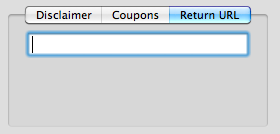
Below in the Check-out options menu you can find a sub-menu for disclaimer, coupons and return URL settings.

Click on �Disclaimer� button and check the box �Show a disclaimer� to add a text that your customer will read before doing the check-out. You can leave a simply question as default one, or put here some information you want your customer to know before
purchasing your products (for example, you can write here term and conditions).
To use coupon feature for discount in your site, check the box here.
For SEO purpose or just to guide back your customer to your site, you can set here an URL where he will be redirected after purchasing.
![]()
Previous: Page Options>Checkout | Disclaimer, coupons and
Return URL
Click on the Cart tab and customize the cart panel as you wish!
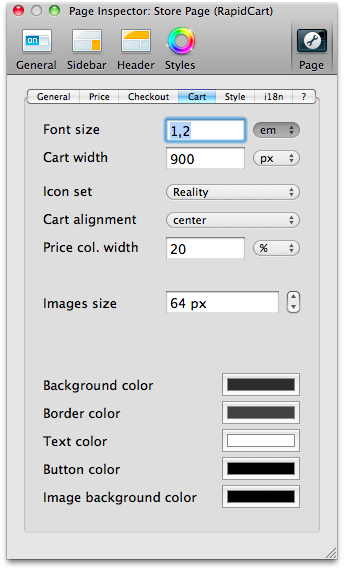
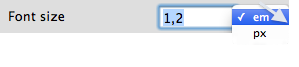
To resize cart font, just write new size on the field. Switch between em1 or pixel as measure the arrow tool on the right.
To resize cart width, just write down in the field the value. Switch between pixel or percentage as measure using the arrow tool on the right. Changing this value the cart will display bigger or smaller as you can see below.

RapidCart provides you two funny styled versions of the cart:

![]()
Just use the arrow tool to choose one of them.
Set the alignment of the entire cart just choosing between Left, Center and Right option.
If you want to take control of the price column width, just set up the percentage or pixels value here. This will affect the space between �Price� label and the amount value in the cart.
Change the size of Products added (in pixels) just using the arrow to increase/decrease the value.
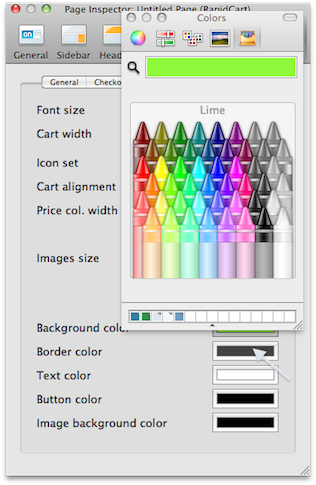
Customize the combination of Background, Text, Button and Border color of your cart with RapidWeaver Color Picker tool. Here an example of what you can do with this tool.
![]()
Previous: Page Options>Set the cart
Take control of cart style using this tab.
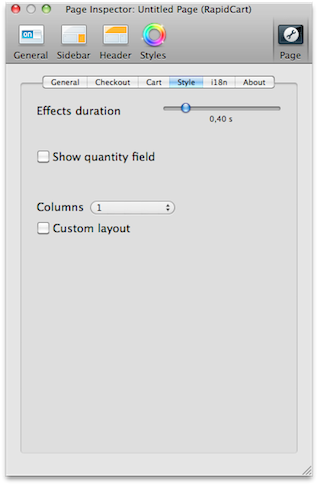
Moving the slider from 0,20 s (seconds) to 1,50 s, you�ll affect the showing time of the visual animation of items going to the cart.
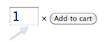
Check this box if you want to show a field on the left of �Add to cart� button on the RapidCart page which can be manually filled in with the number of desired items. This features is recommended for small items store.
Use arrow tool to choose from 1 to 4 column to change the layout of your RapidCart page and arrange products in different columns.
Checking this box, you�ll see internal CSS classes and HTML Divs which you can customize just as you wish. See Customization section for further information and tips about cart customization.
![]()
RapidCart provides you an easy way to localize each cart label.
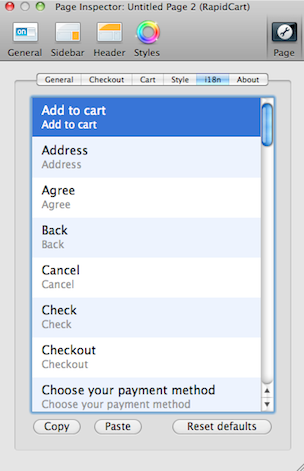
Click on “i18n” tab and 18 editable fields will show.
Double click on each label to translate or modify it just as you wish. Default value will be visible under your new one to recall the exact correspondency.
In case you added more RapidCart pages to your project and wish to copy all translated labels to them, use copy and paste buttons on the bottom of the tab. Click “Copy” in source “Page Option” and then “Paste” to destination “Page Option”.

To reset to default values just push the “Reset defaults” button on the right.
![]()
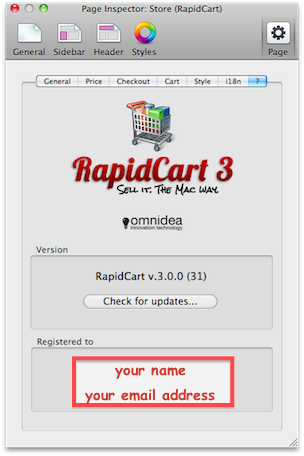
To retrieve information about the version of RapidCart you have installed on your Mac just push on �About� tab. Clicking on RapidCart logo you�re invited to visit our web site www.omnidea.it.
To stay always up-to-date with new releases and enjoy every leaps forward of the plugin, push "Check fo updates" button.
If you are using the latest version, nothing happens.
Otherwise, RapidCart will invite you to download the new release. Read all release notes to find out new features and bug-fixes, then decide whether to �skip the version�(2) or install it (4). Choose "Remind me later"(3) if you decide not to upgrade, but the upgrade will prompt next time you'll open your RapidWeaver project.
NOTE: After installation is done, RapidWeaver will be reloaded so keep in mind to save your current projects before checking for update.
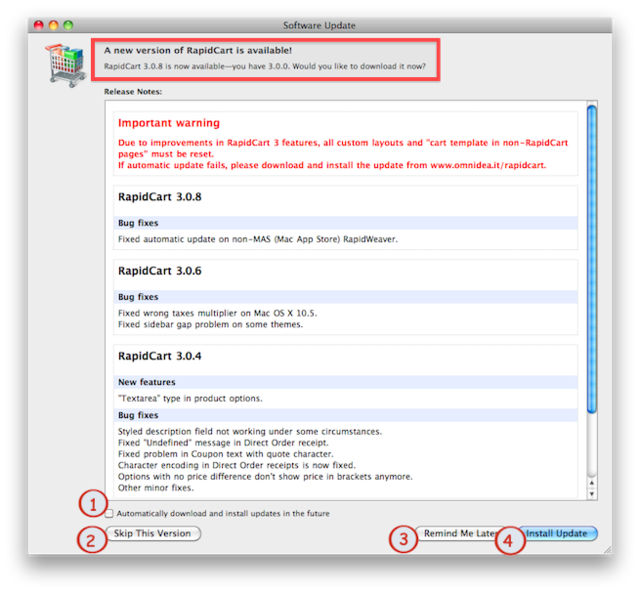
Enable "Automatically download and install updates" (1) to get updates every time they're available without you to lift a finger.
The field below will show name and email of the owner of the RapidCart copy in use. Remember to use the same email address to purchase further upgrade in order to be recognized from automatic registration system.
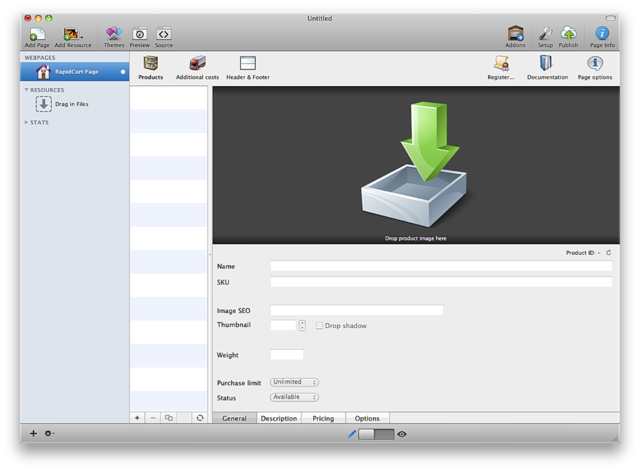
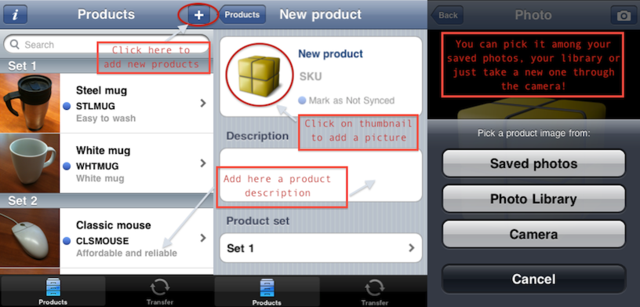
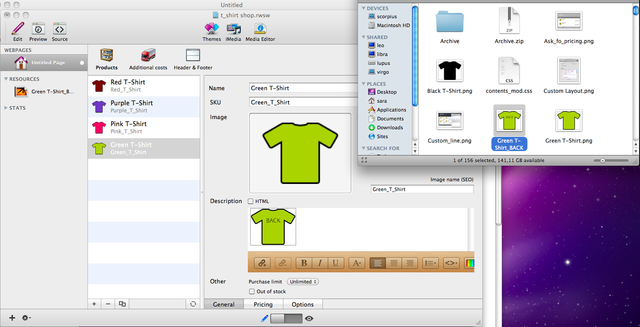
Products panel provides you the way to easily manage store contents.
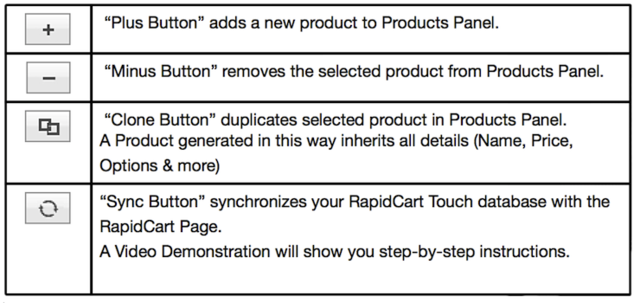
There are two ways to add product to your RapidCart page. First, you can push the "plus button", drag a picture for catalogue (RapidCart will automatically exporte to PNG and resize for a thumbnail the image for you ); fill in manually all product
details. Just click the �plus� button to add more products to your store. Use toolbar under products list to manage the store.
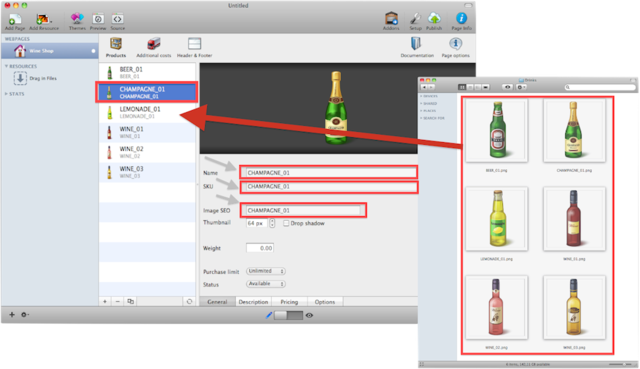
Further, you can fill the form for each product with information needed:
Image: drag the product picture here, then RapidCart will make a thumbnail of it for you. You can import any image formats supported by Mac Preview app (including PDF).
Name: a simple text name.
SKU (is the acronym of Stock-Keeping Unit, a unique identifier for each distinct product and service that can be purchased, enabling merchants to systematically track their inventory, such as in warehouses and retail outlets). SKU field is required with Coupon Codes and E-Junkie.
Image SEO: As you drag your picture in the image window, RapidCart will copy image name in this field. You can then customize it as you wish in order to optimize the search engine retrieval of your items.
Thumbnail: Adjust thumbnail width using the stepper tool. Check the �Drop Shadow� box to add a shadow effect to the item.


Weight: for additional costs based on weights, you can set here an amount for each product. There's no unit, set your own following your specific needs.
Purchase limit: it sets the maximum number of purchasable items per cart (from unlimited to 20); when limit is reached, adding more products won�t affect the cart content.
Out of stock: check the box if this item is not available; it will show an �out of stock� label and suspend order for it.
Second and newest one, you can build up your entire store page in a move by "Dragging and Dropping" your product catalogue pictures from Finder to RapidCart edit panel.
![]()
Previous: Products>Description

This section lets you set prices and other costs for each item on the store.
In particular:
Special price: this is a special offer for the item; old price will show strikethroug above the new one. Check the box if you want to use a promotional price and edit the value;
Taxes: set the percentage of taxes per item; if you already did in Page Option panel (path: Page Option>General>Default TaxRate ), you will find default tax rate value in the field; to change this value for the selected product, simply edit by clicking on the field;
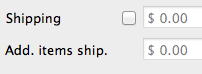
Shipping: shipping costs applied per item; check the box if you need to use it;
Add. items ship.: set the amount for additional items. First item in the cart will have �Shipping� cost applied on, then this additional cost is charged on the others.
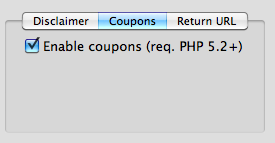
Enable coupon code (**you must have PHP 5.2 or higher on your hosting provider**) from Page options menu (path: Page
option>Checkout>Coupon>Enable Coupon and check the
box). A specific panel will show up in "Pricing" panel of products, and you only have to fill with Code and prices.
NOTE: you must export your project to see coupon codes in action. Coupon code feature doesn�t work on RapidWeaver Preview window.

NOTE: if you see a yellow warning sign, check the SKU field on Products tab; coupon code needs a valid SKU value insert in order to work.
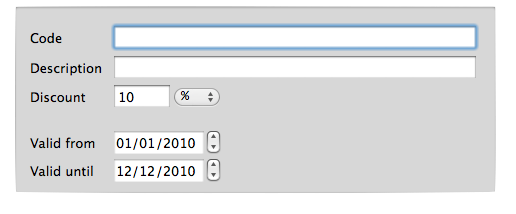
Fill in the Code field with a code number related to the SKU value. RapidCart will look for the coupon code along the store and apply discount for each SKU matching the entered coupon code value. Description field will give details about the coupon promotion and will display under coupon code field in the e-commerce page. Discount is percentage of discount applied for promotional coupon: to set it just edit the field. You can also choose to set a fix discount swithcing from percentage to value with the arrow tool on the right.
To set the validity period for the coupon promotion just modify the field �Valid from� (by default set to today) and �Valid until� (by default set to today+2 month): just use the arrow tool to increase/decrease the values.
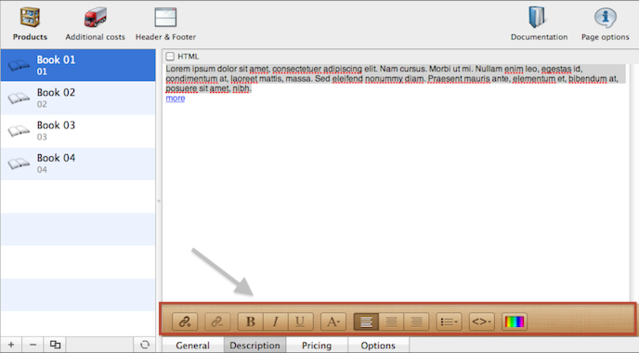
RapidCart comes with a full-view area for products description. By default, you can use rich-text to add a paragraph to describe your product.
For further description of this tool, refer to RapidWeaver manual in "default Styled Text section"
Once published..

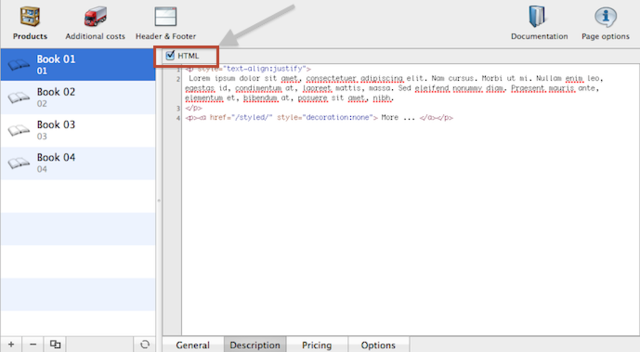
Otherwise, you can tick the HTML flag and freely write text and tags.
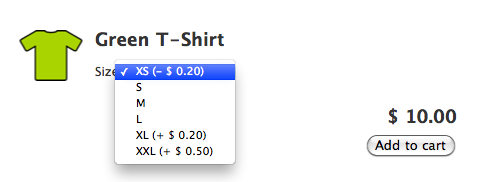
RapidCart lets you add multiple options for each product. Pushing the options button a panel like this below displays:
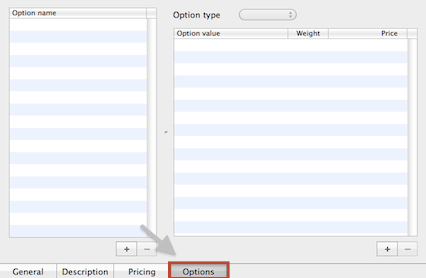
Fill in the �Option name� table with options for the selected product just clicking on the �plus button�; click on �minus button� to remove the selected one. Double-click on each options to change its name.
There are three types of options available. Switch between them with the arrow tool on the upper-right:

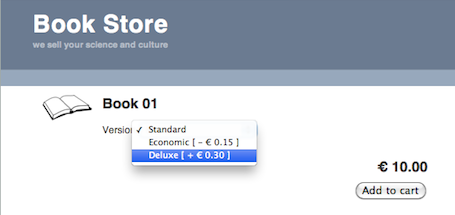
NEW: if an option has surcharge, the item price will be dinamically updated on the right.
RapidCart Touch is a free companion tool for iPhone (available on the App Store) that lets you add products to the cart page just where you are.
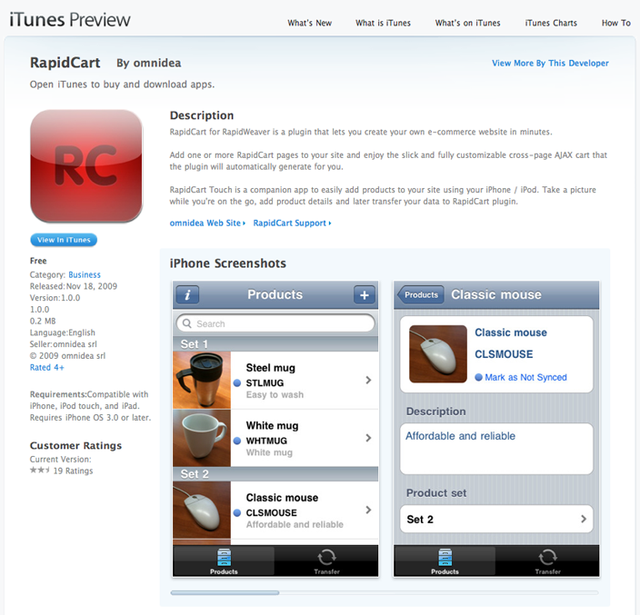
All you have to do is take pictures of your products, add descriptions and SKU...
... and later transfer your data to RapidCart plugin. When transferring, you can pick just a set or more or all and they will be stored correctly in the RapidCart page you were editing!
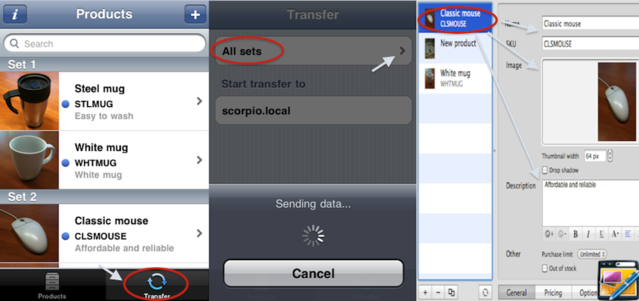
If you own an iPhone/iPod, you can get your copy of RapidCart Touch for free!
Click the “Sync button” below the products list area and a video explanation will show you how to connect iPhone/iPod on Mac and start transferring
data from it to the RapidCart page. All products will automatically placed on the store page with their attribute set!
Click to get your copy of RapidCart Touch or search for it in ![]()
![]()
Previous: RapidCart Touch Syncronization
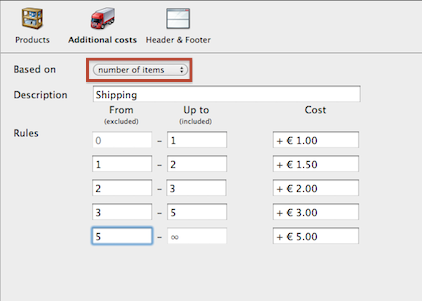
RapidCart provides you a handy way to customize some costs based on number of items in the cart, on total purchase or total weight amount.
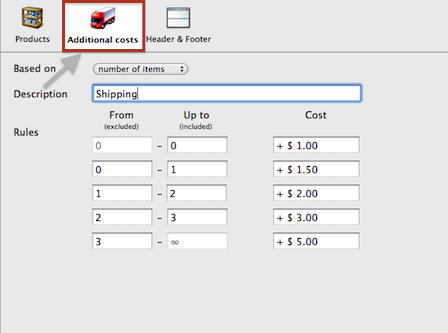
Based on: switch between �total price�, �number of items� or "total weight".
�total price� will arrange sets depending on total cart amount.
�number of items� split sets depending on the number of units,
"total weight" will calculate costs depending on items total weight in the cart ;
Description: this text field lets you describe what this additional cost is about ;
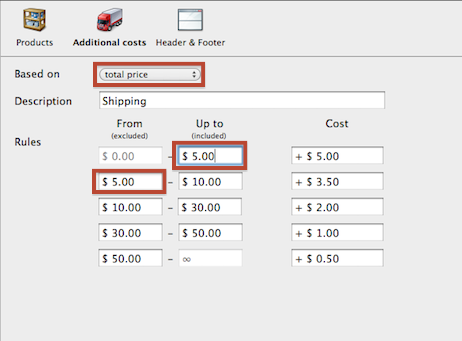
Rules: as you can see from the picture above, on the left side there are five sets (from 0 to ∞): first field of each set is the first value (number of items, amount or weight) and second one is the higher of the set, then you can set the related additional cost.
NOTE: range is [From ...Up To], which means �From value� is excluded and �Up to value� is included ! �Up to value� will be automatically repeated on �From� field of the following row.
Let see through some examples using all cases:
In the first case, there are five sets: [0..$5,00],[$5,00..$10,00],[$10,00..$30,00],[$30,00..$50,00] and [$50,00..∞ ]. Purchases which have total price lower or equal to $5,00 will be charged with $5,00 additional cost. Purchases with total
price from $5,01 to $10,00 will be charged with $4,00 additional cost and so over. You can see this case on the following picture.
In the second case, additional costs settings depend on �number of items� so sets are: [0..1],[1..2],[2..3],[3..5] and [5..∞].
NOTE: if the cart content is 2 items, the cost applied is $1.50 not $2,00 because 2 is included in second set and excluded in third one. Let's see in the picture below.
Last, if products have weights set you can create rules depending from the total weight in the cart.
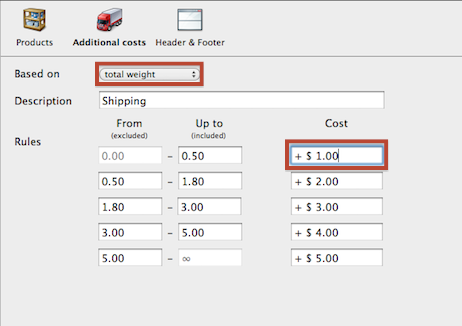
Weights are used for internal calculation, so they don't have measure.
Costs can also have negative values to let you use this feature to set up some promotions.
Don�t use this special feature with PayPal way of
payment because it has problems managing negative
costs!
NOTE: last field is set to ∞ to prevent any kind of purchase looses!
RapidCart plugin provide you a way to customize header and footer of the RapidCart page using a text-area and a set of buttons.
Using simple text or HTML, you can add title and description of the e-commerce content page filling the field up-ward and add other type of information below that will show under shopping area.
For further description of this tool, refer to RapidWeaver manual in "default Styled Text section".
If you have good HTML and CSS skill, you can customize further more your RapidCart-made shopping cart page.
NOTE: contact your Theme developer to be sure that your code modification doesn�t affect the Theme layout.
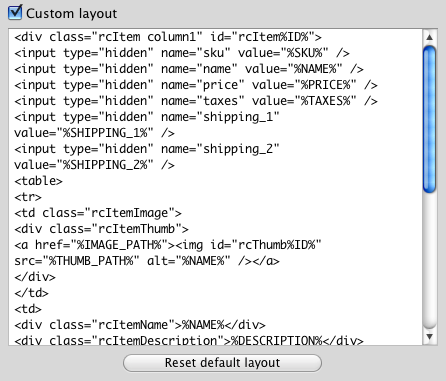
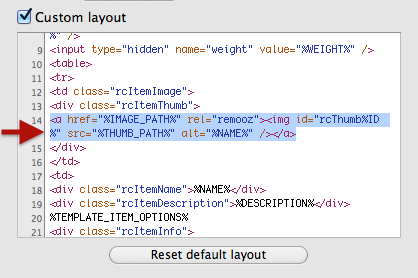
First way to do so is using the "Custom Layout" box in RapidCart Page Options.
To retrieve CSS classes and divs that will be customized, follow the path Page Options > Style and check the �Custom layout� box. The following text area will appear on the bottom.
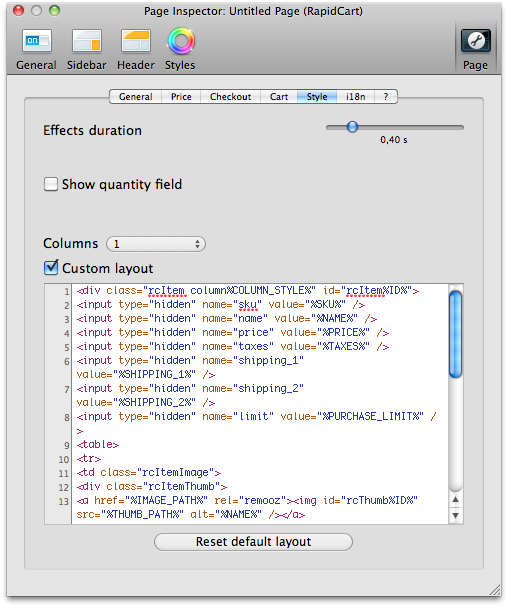
This is the piece of code added per product on each RapidCart page. You can customize here HTML directly adding tags attributes.
Simply delete the following strings from the code:
NOTE: remember not to remove the following string code because it�s essential for the cart!
This will hide prices in the cart page (but you can set them in the Products>Pricing RapidCart Page if you wish a basic price to be set). Then open Page options>Checkout and enable Direct Order mode (remember that you need PHP 5.2 or higher
to use it) and fill this page as you need to. Last, you can change the �Add to cart� label in Page option>i18n to �Ask for pricing�.
So your customer will send you a request and you�ll receive his contact information by email.
The following special tags can be used in Custom Layout.
They will be automatically replaced with corresponding product values.
%COLUMN_STYLE%: number of columns in layout%ID%: product unique ID%SKU%: product SKU%NAME%: product name%PRICE%: product price (not localized)%TAXES%: product taxes (not localized)%SHIPPING_1%: product shipping fees for first item (not localized)%SHIPPING_2%: product shipping fees for more items (not localized)%PURCHASE_LIMIT%: product per-cart purchase limit
%WEIGHT%: product weight%IMAGE_PATH%: product image URL (full size)%THUMB_PATH%: product image URL (thumbnail)%DESCRIPTION%: product description%TEMPLATE_ITEM_OPTIONS%: list of product options
%TEMPLATE_OLD_PRICE%: product old price%I18N_PRICE%: localized product price%DISPLAY_QUANTITY%: "none" if quantity field is hidden, "inline" otherwise%ADD_TO_CART%: text for Add to Cart button%OUT_OF_STOCK%: "disabled" if product is disabled, blank otherwise
Previous: Customization>Custom Layout
If you have a good HTML and CSS knowledge, you can customize further more your RapidCart-made shopping cart page.
NOTE: contact your Theme developer to be sure that your code modification don�t affects the Theme layout.
Another way to add creativity touch to a RapidCart Page is to insert some CSS specific rules in RapidWeaver Page Inspector.
Follow the right path Page Inspector>Header>CSS and customize any RapidCart element in your e-commerce page. Here are the main CSS classes you may change:
.rcItem { /* Put here your code to customize the entire product layout */}
.rcItemImage { /* Put here your code to customize product image */}
.rcItemThumb { /* Put here your code to customize product thumbnail */}
.rcItemName { /* Put here your code to customize product name style */}
.rcItemDescription { /* Put here your code to customize product description style */}
.rcItemInfo { /* Put here your code to customize the Price, Old Price and �Add to cart� button container layout*/}
.rcItemPrice { /* Put here your code to customize product price style */}
.rcItemButtons { /* Put here your code to customize buttons style */}
Some Theme may force style and so your CSS code could not affects the layout. You may force it using � !important;� in your rules, for example:
.rcItemDescription a:link,
.RapidCartItemDescription a:visited { color: red !important; text-decoration: underline !important; }
This tells the browser to apply this rule before the other in CSS files.
To better separate product on page layout you can add a line between them. To do so, open �Page Inspector>Header>CSS� and add this line in the box to have the effect you can see on the picture below:
.rcItem { border-bottom: 2px solid black; }
This is a CSS instruction to add a �2px� black line under each product. Let's see how it would look like after customization in picture below.

Previous: Customization>Header CSS
If you have a good HTML and CSS skill, you can customize further more your RapidCart-made shopping cart page.
NOTE: contact your Theme developer to be sure that your code modification don’t affects the Theme layout.
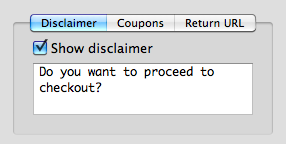
Further way to customize your RapidCart eCommerce page is using checkout disclaimer.
Disclaimer will appear every time a customer is ready to checkout. If you want to use it, enable “Show Disclaimer” following the path Page options>Checkout>Disclaimer. You can leave the default question “Do you want to proceed to checkout?” or fill the text area with any information you want your customer to know before proceeding with payment. For example, “I have read and agree with the Terms and Conditions” or explain shipping fares and times.
NOTE: Disclaimer text area accepts HTML tags so you can change and restyle it as you wish.

It’s up to your needs and imagination!
![]()
Enable the Custom layout field in Options windows and paste this code:
<div class="rcItem column%COLUMN_STYLE%" id="rcItem%ID%">
<input type="hidden" name="sku" value="%SKU%" />
<input type="hidden" name="name" value="%NAME%" />
<input type="hidden" name="taxes" value="%TAXES%" />
<input type="hidden" name="shipping_1" value="%SHIPPING_1%" />
<input type="hidden" name="shipping_2" value="%SHIPPING_2%" />
<input type="hidden" name="limit" value="%PURCHASE_LIMIT%" />
<input type="hidden" name="weight" value="%WEIGHT%" />
<table>
<tr>
<td class="rcItemImage">
<div class="rcItemThumb"><a href="%IMAGE_PATH%" rel="remooz"><img id="rcThumb%ID%" src="%THUMB_PATH%" alt="%NAME%" /></a></div>
</td>
<td>
<div class="rcItemName">%NAME%</div>
<div class="rcItemDescription">%DESCRIPTION%</div>
%TEMPLATE_ITEM_OPTIONS%
<div class="rcItemInfo">
%TEMPLATE_OLD_PRICE%
<div class="rcItemPrice">$ <input type="text" size="5" name="price" value="0.00" /></div>
<div class="rcItemButtons">
<span style="display: %DISPLAY_QUANTITY%;"><input type="text" name="quantity" value="1" size="3" /> × </span>
<input type="button" value="%ADD_TO_CART%" onclick="rc.addItem('%ID%', this);" %OUT_OF_STOCK% />
</div>
</div>
</td>
</tr>
</table>
</div>
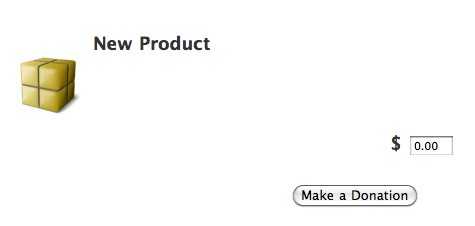
Previewing the page you will see a free box area where clients can fill with their donations. You can also modify �Add to cart� label with �Make a Donation�.
![]()
Previous: How Can I set a RapidCart for donations
I want to sell memberships depending on annual income.
If customer's income is below $4000/year, membership is free, otherwise is $1 for each thousand.
Create a new product.
Add a text field option.
Enable Custom Layout in Options->Style window.
Add the following code to the bottom.
<script type="text/javascript">
$$("#rcItem%ID% input[type=button]").each(function (el) {
el.disabled = true;
});
$$("#rcItem%ID% input[name=rcItemOptionValue]").addEvent("keyup", function () {
var price = 0;
$$("#rcItem%ID% input[type=button]")[0].disabled = true;
if (!isNaN(this.value) && this.value != 0 && this.value != "") {
var fee = Math.floor(this.value / 1000);
if (fee > 4) {
price = fee;
$$("#rcItem%ID% input[type=button]")[0].disabled = false;
}
}
$$("#rcItem%ID% input[name=price]")[0].value = price;
RapidCartUtilities.updatePrice(%ID%);
});
</script>
![]()
Previous: Change price depending on entered value
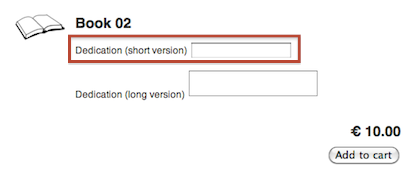
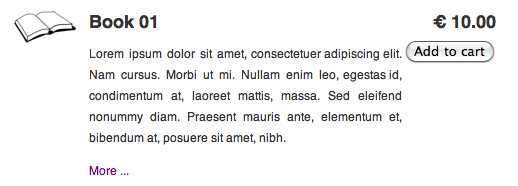
Though not directly supported by RapidCart, you can add a "More info..." button with a small piece of HTML/JS code in your product description.
Paste this code
SHORT_DESCRIPTION<br />
<a href="#" onclick="$('moreinfo%ID%').toggle(); return false;">More info...</a>
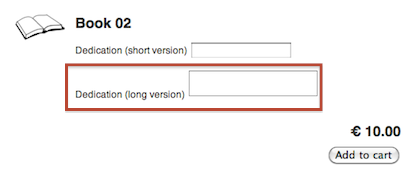
<div style="display: none;" id="moreinfo%ID%">
LONG_DESCRIPTION
</div>
Replace SHORT_DESCRIPTION with your description snippet
![]()
Previous: Adding a "More Info..." button in Description Field
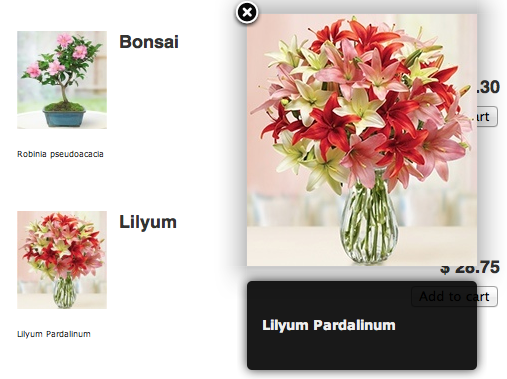
The most effective way to sell your product is through pictures. RapidCart can provide you an easy way to show different thumbnails of the same product.
Let's explain through a simple example: we're assuming we have a T-Shirt store and we're selling
different colors of each item.
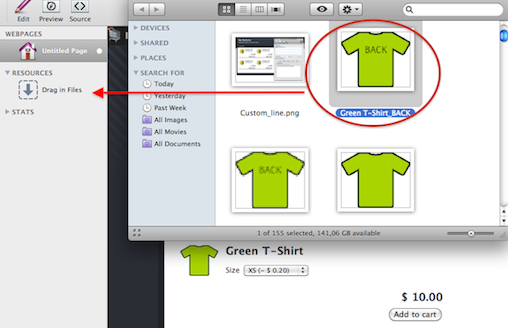
When we first add the product, it will look like this:
We want our customer to see also back side. We directly drag and drop the big picture from Finder to RapidWeaver resources menu.
Then we manually create a picture thumbnail with an external graphic tool such as Preview (as RapidCart won't resize them for us). We drag this thumbnail to the product description field and add an hyperlink.
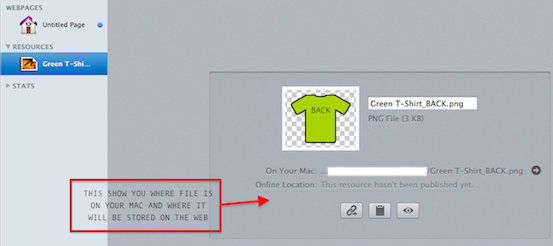
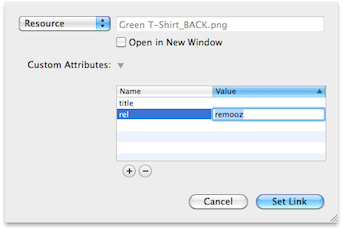
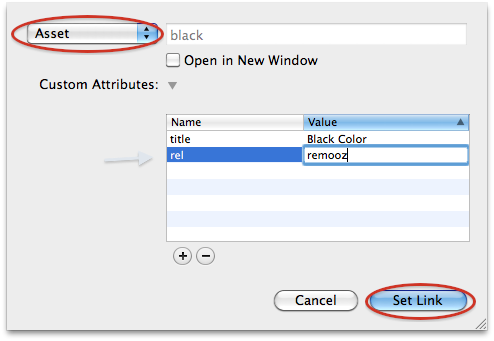
Last we assign the zooming effect to the thumbnail by adding "rel" attribute to that link.
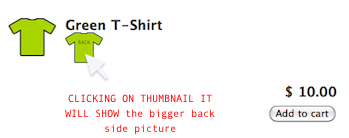
That's how it will look like at the end.
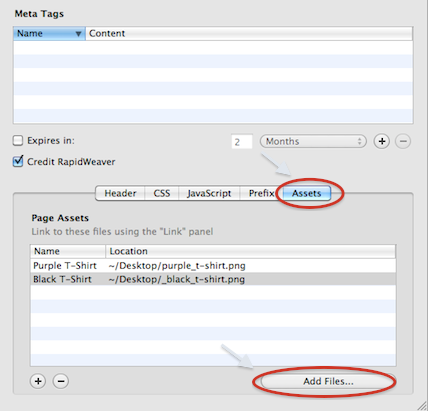
RapidWeaver 4 users have to use assets to upload and link external resources. Again, we're assuming we have a T-Shirt store and we're selling different colors of each item. We decide to show all available colors in description field, so we must upload
big pictures using Page options>Header>Assets.
We upload files using "Add Files.." button.
Then we create thumbnails of each picture, though
RapidCart won't resize them for us! We created thumbnails using Preview resizing tool, but every external picture resizing tool would be perfect as well.
All we have to do now is just dragging thumbnails into
"Description" field and add an hyperlink to each of them pointing to the big picture.
"Description" field accepts HTML so we can add lines, text or else to customize items presentation. Previewing our T-Shirt Shop, it will look like this:
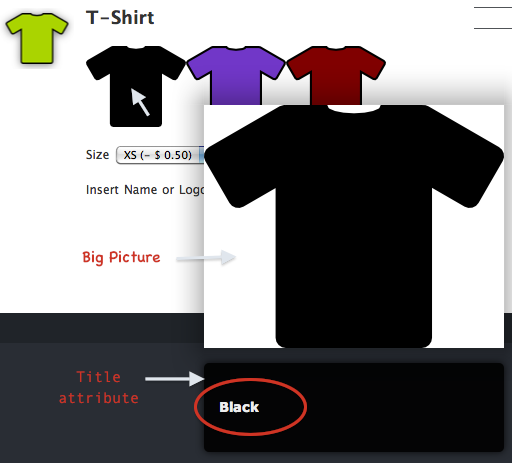
Clicking on thumbnails will open the related big picture.
![]()
Previous: Adding Multiple Thumbnails for each item
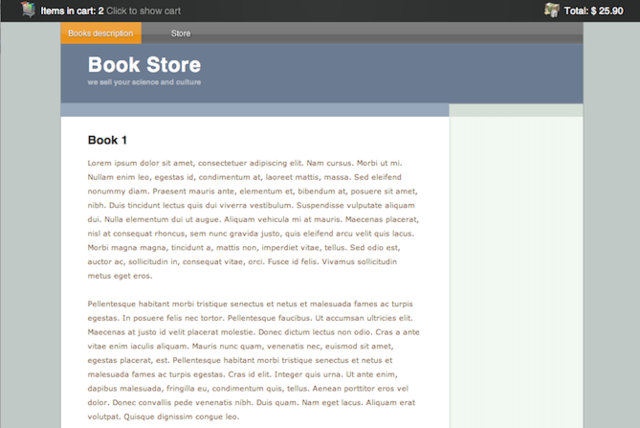
It's handy to have the cart in other pages of your site so visitors can surf without loosing their cart content and keeping the cart amount always on top.
We will use a book shop to illustrate how to do it.
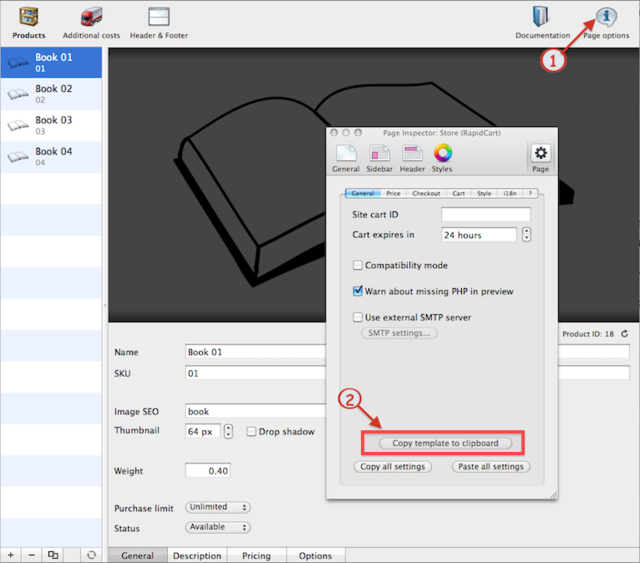
Open your RapidWeaver project with
the RapidCart page in it. Click on Page Options > General in the RapidCart page and then on `Copy template to clipboard"button as you see below:
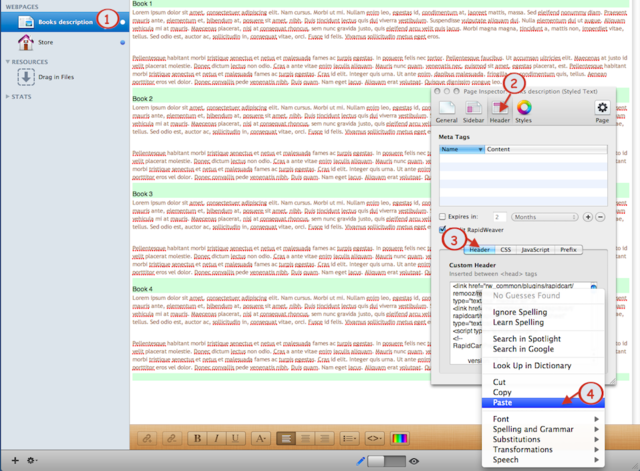
Now choose the non-RapidCart page (1) you need to insert the cart to and open "Page Inspector". Select Header (2)> Header Custom (3) and paste the code into the window.
NOTE: You won't see the cart in Preview mode. You have to publish the site.
If the non-RapidCart page is stored in the root of your
site (e.g. http://www.your-site.com), you've just finished and it will look like this:
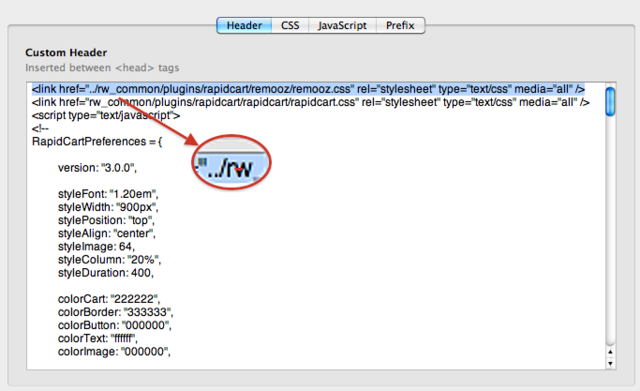
If the non-RapidCart page lays in a folder (e.g.
http://www.your-site.com/folder1/ ), you need to adjust the code for any rw_common reference.
Go to the non-RapidCart page and open "Page Inspector": as above, go to Header > Custom Header to edit the code.
For each path having a reference to rw_common set it as ../rw_common.
If the non-RapidCart page is in
http://www.your-site.com/folder/subfolder/ add the
../ twice for each rw_common occurrence.
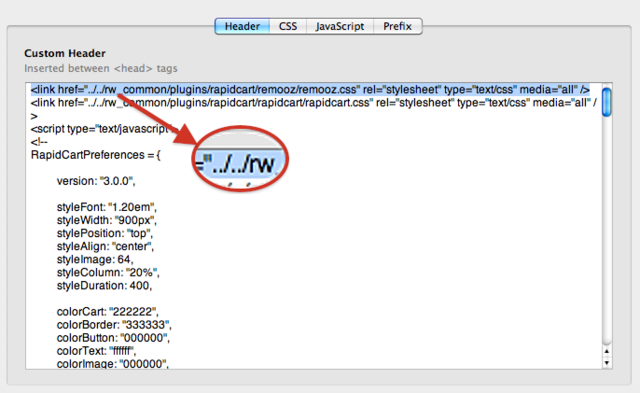
Then publish the site again.
![]()
Previous: Add the cart to non-RapidCart Pages
Enable Custom layout in Options -> Style window.
Replace line 26 with the following code
<input id="button%ID%" type="image" src="%resource(image.png)%" onclick="rc.addItem('%ID%', this);" %OUT_OF_STOCK% />
<script type="text/javascript">
var button = document.getElementById("button%ID%");
if(button.disabled == true) {
button.src = "%resource(image_disabled.png)%";
}
</script>
where image.png is the path of your image and
image_disabled.png is the path of your "out-of-stock" version.
For further information about resources path, please visit
the related
RapidWeaver Support Section.
![]()
Previous: How to replace Add To Cart button
If you want to align product names and prices enable custom layout (path: Page Options > Style > Custom Layout) and paste the following code:
<div class="rcItem column%COLUMN_STYLE%" id="rcItem%ID%">
<input type="hidden" name="sku" value="%SKU%" />
<input type="hidden" name="name" value="%NAME%" />
<input type="hidden" name="price" value="%PRICE%" />
<input type="hidden" name="taxes" value="%TAXES%" />
<input type="hidden" name="shipping_1" value="%SHIPPING_1%" />
<input type="hidden" name="shipping_2" value="%SHIPPING_2%" />
<input type="hidden" name="limit" value="%PURCHASE_LIMIT%" />
<input type="hidden" name="weight" value="%WEIGHT%" />
<table>
<tr>
<td class="rcItemImage">
<div class="rcItemThumb">
<a href="%IMAGE_PATH%" rel="remooz"><img id="rcThumb%ID%" src="%THUMB_PATH%" alt="%NAME%" /></a>
</div>
</td>
<td>
<div class="rcItemName">%NAME%</div>
<div class="rcItemDescription">%DESCRIPTION%</div>
%TEMPLATE_ITEM_OPTIONS%
</td>
<td>
<div class="rcItemInfo">
%TEMPLATE_OLD_PRICE%
<div class="rcItemPrice">%I18N_PRICE%</div>
<div class="rcItemButtons">
<span style="display: %DISPLAY_QUANTITY%;"><input type="text" name="quantity" value="1" size="3" /> × </span>
<input type="button" value="%ADD_TO_CART%" onclick="rc.addItem('%ID%', this);" %OUT_OF_STOCK% />
</div>
</div>
</td>
</tr>
</table>
</div>
Then go to Header > CSS and paste this rule:
.rcItemInfo { margin-top: 0px !important; font-size: 0.8em !important; }
You can change font-size to 1em, 2em or whatever you like!
This is what your RapidCart page will look like after:
![]()
Previous: How to align price with product name
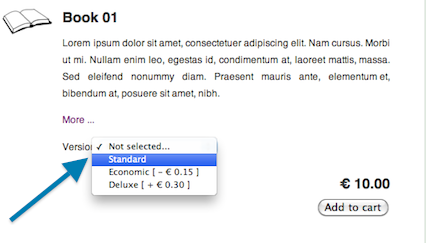
If you want to force your customer to choose an option before purchase, add a "fake" option with "not selected..." as the first choice:
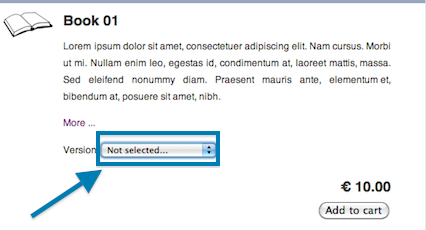
Then enable Custom Layout in Options->Style window and replace default code with the following one.
<div class="rcItem column%COLUMN_STYLE%" id="rcItem%ID%">
<input type="hidden" name="sku" value="%SKU%" />
<input type="hidden" name="name" value="%NAME%" />
<input type="hidden" name="price" value="%PRICE%" />
<input type="hidden" name="taxes" value="%TAXES%" />
<input type="hidden" name="shipping_1" value="%SHIPPING_1%" />
<input type="hidden" name="shipping_2" value="%SHIPPING_2%" />
<input type="hidden" name="limit" value="%PURCHASE_LIMIT%" />
<input type="hidden" name="weight" value="%WEIGHT%" />
<table>
<tr>
<td class="rcItemImage">
<div class="rcItemThumb">
<a href="%IMAGE_PATH%" rel="remooz"><img id="rcThumb%ID%" src="%THUMB_PATH%" alt="%NAME%" /></a>
</div>
</td>
<td>
<div class="rcItemName">%NAME%</div>
<div class="rcItemDescription">%DESCRIPTION%</div>
%TEMPLATE_ITEM_OPTIONS%
<div class="rcItemInfo">
%TEMPLATE_OLD_PRICE%
<div class="rcItemPrice">%I18N_PRICE%</div>
<div class="rcItemButtons">
<span style="display: %DISPLAY_QUANTITY%;"><input type="text" name="quantity" value="1" size="3" /> × </span>
<input type="button" value="%ADD_TO_CART%" onclick="var emptyfield = false; $$('#rcItem%ID% .rcItemOption input[type=text]').concat($$('#rcItem%ID% .rcItemOption textarea')).each(function (el) { if (el.value == '') { emptyfield = true; } }); $$('#rcItem%ID% .rcItemOption select').each(function (el) { if (el.options[0].selected) { emptyfield = true; } }); if (emptyfield) { alert('Please enter some text or choose an option to add product to the cart.'); } else { rc.addItem('%ID%', this); }" %OUT_OF_STOCK% />
</div>
</div>
</td>
</tr>
</table>
</div>
Add mandatory options to your product. When "not selected" is highlighted, the "Add to Cart" button won't work.
![]()
Previous: How to make options mandatory?
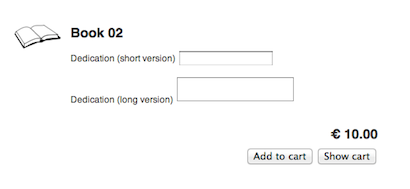
Enable Custom Layout in Page Options -> Style window and add the following code at line 27:
<input type="button" value="Show cart" onclick="rc.toggleContent();" />
just below this code:
<input type="button" value="%ADD_TO_CART%" onclick="rc.addItem('%ID%', this);" %OUT_OF_STOCK% />
It will look like this:
Remember that if you want to localize the button text, you can change value="your_text" .
![]()
Previous: How to create a show cart button?
Though not directly supported, you can add an anchor to your product in store page and link it in your product page.
First create a product page with details:
Add a link to your store in this page adding #1234 at the end of the link (where 1234 is your actual SKU).
For example:
http://www.domain.com/store.htmluse this link
http://www.domain.com/store.html#1234.
Enable Custom Layout in Page Options -> Style window and add this code to the top:
<a name="46778-%SKU%"></a>
This way, the customer will be redirected to the store page and window will automatically scroll to product.
![]()
Previous: How to add a direct link to a product?
First of all, create a product page for each of your RapidCart products and set the page name as SKU.html where SKU is the corresponding SKU in RapidCart.
For example:
Then switch to your RapidCart page and enable Custom Layout in Options -> Style window.
Just after %DESCRIPTION% tag on line 19, add the following code:
<div id="fb-root"></div>
<script src="http://connect.facebook.net/en_US/all.js#appId=110235705750960&xfbml=1" type="text/javascript"></script>
<fb:like href="http://www.mydomain.com/path/to/my/products/%SKU%.html" send="false" layout="button_count" show_faces="false"></fb:like>
where http://www.mydomain.com/path/to/my/products/ is the path where products pages you have previously created resides.
Don't change last part of the link (%SKU%.html).
While in Preview, you should see one "Facebook Like" button just below each product description.
![]()
Previous: Add a facebook like button
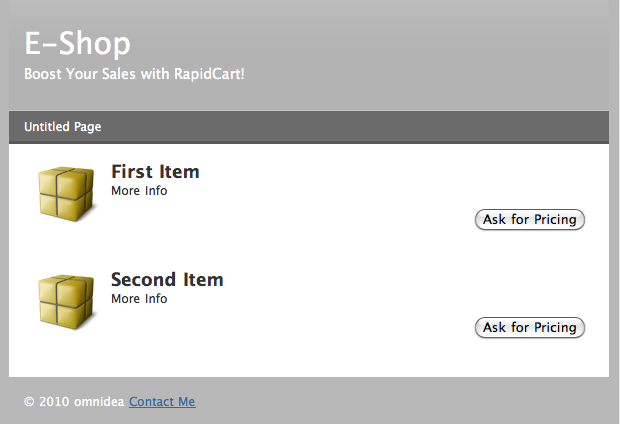
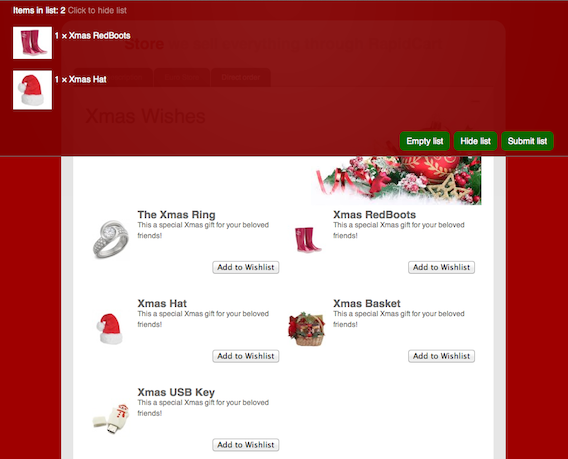
Xmas is near, so why can't we use RapidCart and Direct Order combination to let customer tell us their wishes?
First, set up a normal RapidCart page with products and prices. We don't want our customer to see prices, but only to choose what they desire.
So we will hide price and value information enabling custom
layout in PageOptions > Style and pasting the following code:
<div class="rcItem column%COLUMN_STYLE%" id="rcItem%ID%">
<input type="hidden" name="sku" value="%SKU%" />
<input type="hidden" name="name" value="%NAME%" />
<input type="hidden" name="taxes" value="%TAXES%" />
<input type="hidden" name="shipping_1" value="%SHIPPING_1%" />
<input type="hidden" name="shipping_2" value="%SHIPPING_2%" />
<input type="hidden" name="limit" value="%PURCHASE_LIMIT%" />
<input type="hidden" name="weight" value="%WEIGHT%" />
<table>
<tr>
<td class="rcItemImage">
<div class="rcItemThumb"><a href="%IMAGE_PATH%" rel="remooz"><img id="rcThumb%ID%" src="%THUMB_PATH%" alt="%NAME%" /></a></div>
</td>
<td>
<div class="rcItemName">%NAME%</div>
<div class="rcItemDescription">%DESCRIPTION%</div>
%TEMPLATE_ITEM_OPTIONS%
<div class="rcItemInfo">
<div class="rcItemButtons">
<input type="button" value="%ADD_TO_CART%" onclick="rc.addItem('%ID%', this);" %OUT_OF_STOCK% />
</div>
</div>
</td>
</tr>
</table>
</div>
After that, you should use the i18n feature to edit all button labels (e.g. "Add to Cart" --> "Add to my Wish list").
Using some CSS rules, we will hide all images and thumbnails that refer to a payment. Open PageOptions >
Header > CSS and paste this code:
.rcItemPrice, .rcItemOldPrice, .rcCartPrices, #rcCartTotal {display:none !important;}
.rcButton img { display:none !important}
#rcCartItems img{ display:none !important;}
The result page should look like this:
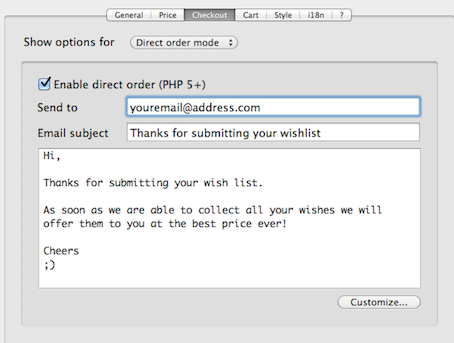
Last, set up Direct Order as payment method in
PageOptions > Checkout and customize the email subject and text. Here an example.
Now you're ready with your Santa Claus new shop!
![]()
RapidCart pages let customers check the cart content normally by clicking on the bar:

If you want your cart content to show automatically after an item has been added to it, open PageOptions >
Style tab and paste the following code:
<div class="rcItem column%COLUMN_STYLE%" id="rcItem%ID%">
<input type="hidden" name="sku" value="%SKU%" />
<input type="hidden" name="name" value="%NAME%" />
<input type="hidden" name="price" value="%PRICE%" />
<input type="hidden" name="taxes" value="%TAXES%" />
<input type="hidden" name="shipping_1" value="%SHIPPING_1%" />
<input type="hidden" name="shipping_2" value="%SHIPPING_2%" />
<input type="hidden" name="limit" value="%PURCHASE_LIMIT%" />
<input type="hidden" name="weight" value="%WEIGHT%" />
<table>
<tr>
<td class="rcItemImage">
<div class="rcItemThumb">
<a href="%IMAGE_PATH%" rel="remooz"><img id="rcThumb%ID%" src="%THUMB_PATH%" alt="%NAME%" /></a>
</div>
</td>
<td>
<div class="rcItemName">%NAME%</div>
<div class="rcItemDescription">%DESCRIPTION%</div>
%TEMPLATE_ITEM_OPTIONS%
<div class="rcItemInfo">
%TEMPLATE_OLD_PRICE%
<div class="rcItemPrice">%I18N_PRICE%</div>
<div class="rcItemButtons">
<span style="display: %DISPLAY_QUANTITY%;"><input type="text" name="quantity" value="1" size="3" /> × </span>
<input type="button" value="%ADD_TO_CART%" onclick="rc.addItem('%ID%', this);setTimeout(function(){rc.toggleContent();},500)" %OUT_OF_STOCK% />
</div>
</div>
</td>
</tr>
</table>
</div>
![]()
Previous: Showing a Drop Down Cart
If you want to add a caption below the product thumbnails, follow these steps:
Open Page Options> Style> and enable custom layout.
Add a paragraph within the default 14th row after that has a variable value such as %SKU% or %Name%
but remember that thumbnail default size is 64px so texts should be short (or tiny) or they'll go to a new line. Enlarge thumbnails
size as alternative option ( you can do it on RapidCart
Product> General panel of each item)
e.g.
<a href="%IMAGE_PATH%" rel="remooz"><img id="rcThumb%ID%" src="%THUMB_PATH%" alt="%NAME%" /></a><p class="caption">%SKU%</p></div>
On that specific example <p
class="caption">%SKU%</p> the paragraph adds a CSS class (caption) to set a specific layout.
2.a Change layout settings for that class by using
Page
Options
> Header >
CSS and the following rule:
.caption { /* set here font-size or any other custom style */ }
If you want caption on the zoomed image also, add title tag on anchor for the image (always row 14):
<a href="%IMAGE_PATH%" rel="remooz" title="%SKU%">
NOTE: You should enter a dynamic variable for the title such as %NAME% (or any other such as %SKU% ) because they dynamically adapt to each different product.
This is how it will look like:
![]()
Previous: Add a Caption under Product Thumbnail
You can add up to 15 fields in Direct Order mode to gather information from your customer during the purchase process.
Why not using pieces of this information in the confirmation mail?
Open your RapidWeaver project and go to the RapidCart page. Enable Direct Order mode if you haven't.
See here for requirements
Click on Customize... to edit the 15 available field labels: we will use only required fields in the body of the letter to prevent blank spaces or non-sense.
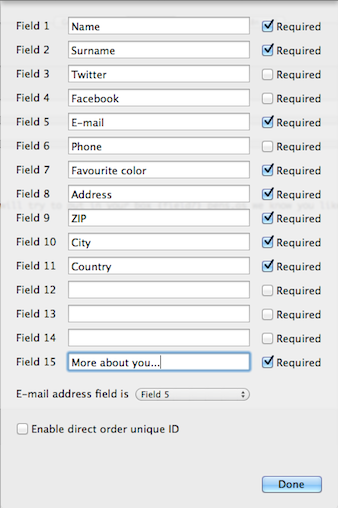
You can refer to each field value by using {field#} (where # stands for a number from 1 to 15).
For example:
Hi {field1},

thanks for your order! What's the wheather in {field10}?

We will soon contact you at {field5}. Is that correct?
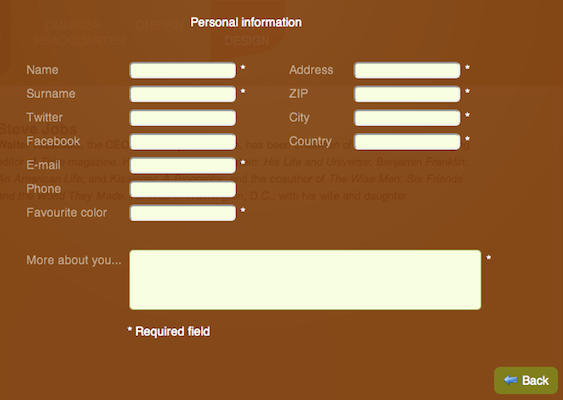
It will result as:
Hi John,

thanks for your order! What's the wheather in Los Angeles?

We will soon contact you at john.doe@nowhere.com. Is that correct?
If you want to go further, open Page Options>
Header>CSS and put CSS rules for each field referring as:
#rcField1{/* put here your rules */ }
obviously refer to #rcField2 for the second field and so on.
For example, the following code...
#rcField1{ background-color: #F7FFDE !important; color: rgb(165,183,107) !important; -webkit-border-radius:5px !important;}
... will change the background color and add rounded corner to the input field!
Enable Custom Layout in Options->Style window and replace line 19 with the following code.
<div class="rcItemDescription">%DESCRIPTION%<p><a href="#" onclick="new Fx.Scroll($(document.body)).toTop();return false">Scroll to top</a></p></div>


